Stark weird noise and no crawl/ reverse... Drive train not reacting to throttle inputs


Chaconne

Well-known member
Likes
91
Location
Massachusetts
I have to add that I think it's a major design flaw to have a huge opening on the upper triple clamp that feeds water to a somewhat sealed wiring box below. What on earth were they thinking??? They might as well make the box open beneath so it at least drains. My solution will be to make a silicone plug that perfectly fits that hole up top. Every time you wash the bike water goes there!
This is rather common on European machines. It is poor attention to detail. My 2020 KTM is terrible when it comes to water sealing in almost every aspect fuel, electrical, & etc.

Initially I thought Stark was going to take a different approach when they said the bike could be powerwashed but that was retracted and you have to be very careful to seal off junctions, connections, and wiring.

Also switches are not well sealed on the Stark either, the main power switch is very susceptible to both dirt and water intrusion. I have been stranded due to it. My 2014 Yam WR450 has great water sealed switches and is more water tight than either newer KTM or Stark.

In Stark's defense the first versions were MX bikes which would likely be used on a closed track so getting stranded miles away from a carrier was probably not a first consideration. I have used my bike as an Enduro so the handlebars going full depth in mud and water probably wasn't a first design consideration. But from @Aleksandar13 's reports seems there are still some openings even on gen 2.:muutt:
 

Aleksandar13

Well-known member
Likes
98
Location
Uk
This is rather common on European machines. It is poor attention to detail. My 2020 KTM is terrible when it comes to water sealing in almost every aspect fuel, electrical, & etc.

Initially I thought Stark was going to take a different approach when they said the bike could be powerwashed but that was retracted and you have to be very careful to seal off junctions, connections, and wiring.

Also switches are not well sealed on the Stark either, the main power switch is very susceptible to both dirt and water intrusion. I have been stranded due to it. My 2014 Yam WR450 has great water sealed switches and is more water tight than either newer KTM or Stark.

In Stark's defense the first versions were MX bikes which would likely be used on a closed track so getting stranded miles away from a carrier was probably not a first consideration. I have used my bike as an Enduro so the handlebars going full depth in mud and water probably wasn't a first design consideration. But from @Aleksandar13 's reports seems there are still some openings even on gen 2.:muutt:
Agreed all manufacturers have some niggles, I will spend some time and get this sealed up just cause it's a simple solution and report back.
I'm curious to see if the bike has any stored faults that stark can find if they decide to connect to my bike and will post back.

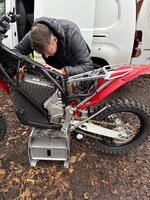
Striping the bike down and going through all the plugs with contact spray was a good experience, I've learned a lot and feel a lot more confident now knowing where everything is. Also the middle connection between the ecu and the engine is a quarter turn connection of some sort which was very quick to come loose so I wonder if this was touched by the suspension people and not put back properly hence caused the issues I had.

IMG_9389.jpeg
 

Aleksandar13

Well-known member
Likes
98
Location
Uk
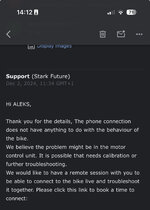
Stark replied to me this morning and asked me to send them the video of the bike. Their reply is below... Only available date for me to be at home was Thursday so we are having a live call and they will connect to the bike to check the motor control unit and to see what happened. Pretty good response from them.. Bike seems fine now and it's working but I'd like to get them to check any fault codes etc and see... Keeping you updated as we move along

IMG_9398.jpeg
 

Aleksandar13

Well-known member
Likes
98
Location
Uk
Update on the situation … the bike was fine and I put another 4 hours on the bike with no issues at all , this morning I had my meeting with stark and funny enough the bike started acting funny before the meeting so that was either luck or I don’t know 🤷‍♂️… stark connected to the bike and done a check on the throttle first , all good . Them tried to recalibrate the power unit sensor where the wheel and the motor sync together … didn’t work at all … he forced an update and tried again.. nothing . He stated something inside the power unit to do with position of the motor is not working as it should and they will replace the power unit, either I change it or the dealer .. waiting to see how quick that will arrive and get it changed.
Spoke to my dealer and he said he will pursue the issue with them to find what is wrong as it is the first gen2 he has heard of with this problem. I must say that dealing with stark is very smooth and professional no bullshit qs asked.
I have decided to do the job myself so look forward to that now 😀
 

Theo

Well-known member
Likes
149
Location
Italy
they will replace the power unit
[...]
I have decided to do the job myself so look forward to that now 😀
I suggest that you make sure to know how to properly disconnect the battery power plug. Remembering that I am not a professional techincian, here is what I know:
Since people with a gen 1 battery should use a conversion kit for the gen 2 motor, I suspect that the High Voltage InterLock connector, which is that orange connector that connects the battery to the power unit, could not be the same type that we have in the gen 1. However, the one of the gen 1 looks pretty similar to this one @ 1:22 in the video; notice how you have to unlock the upper tab before you can unlock the lower one:
When I say upper and lower I mean up is towards the slider and down towards the socket.
As far as I've learnt, this is what happens:
1- pulling out the slider lets you push the upper tab,
2- pushing the upper tab while simultaneously pulling the plug disconnects the low voltage terminals, so now the battery has the piece of information that the plug is going to be disconnected and at this point it would never send current to the high voltage terminals,
3- pushing the lower tab while simultaneosly pulling the plug lets you disconnect the plug completely.
In the Stark's videos it seems to me that their technician pushes the two tabs at the same time and pulls the plug removing it in a single motion.
At this point I think that the battery should be pretty safe and that the only possible dangerous spot are the terminals of the power unit cable, since I can't know for sure whether there are capacitors in the power unit that can still hold some charge and release it, for example I guess that if the pre-charge capacitor is still charged it can be dangerous to touch the terminals. So I think that you should just make sure not to touch them.
 

Aleksandar13

Well-known member
Likes
98
Location
Uk
I suggest that you make sure to know how to properly disconnect the battery power plug. Remembering that I am not a professional techincian, here is what I know:
Since people with a gen 1 battery should use a conversion kit for the gen 2 motor, I suspect that the High Voltage InterLock connector, which is that orange connector that connects the battery to the power unit, could not be the same type that we have in the gen 1. However, the one of the gen 1 looks pretty similar to this one @ 1:22 in the video; notice how you have to unlock the upper tab before you can unlock the lower one:
When I say upper and lower I mean up is towards the slider and down towards the socket.
As far as I've learnt, this is what happens:
1- pulling out the slider lets you push the upper tab,
2- pushing the upper tab while simultaneously pulling the plug disconnects the low voltage terminals, so now the battery has the piece of information that the plug is going to be disconnected and at this point it would never send current to the high voltage terminals,
3- pushing the lower tab while simultaneosly pulling the plug lets you disconnect the plug completely.
In the Stark's videos it seems to me that their technician pushes the two tabs at the same time and pulls the plug removing it in a single motion.
At this point I think that the battery should be pretty safe and that the only possible dangerous spot are the terminals of the power unit cable, since I can't know for sure whether there are capacitors in the power unit that can still hold some charge and release it, for example I guess that if the pre-charge capacitor is still charged it can be dangerous to touch the terminals. So I think that you should just make sure not to touch them.
Thanks mate that’s great information appreciate it 😁
It is nice to be part of a community that delivers information and help when required. Stark replied today with an order number and a shipping tracking number to follow
they stated 5 to 10 days to ship to me depending on location etc , I’m hoping that I’m only 2 hours flight away from Spain it will be the 5 days. I wanted to exchange the unit after Christmas.
 

Aleksandar13

Well-known member
Likes
98
Location
Uk
after speaking with them yesterday the power unit is today being shipped with delivery date on the 30th of December… decent
 

Theo

Well-known member
Likes
149
Location
Italy
It is nice to be part of a community that delivers information and help when required.
That's true!!!

Since people with a gen 1 battery should use a conversion kit for the gen 2 motor, I suspect that the High Voltage InterLock connector, which is that orange connector that connects the battery to the power unit, could not be the same type that we have in the gen 1.
I've just noticed, from one of your pictures above, that the connector of your gen 2 looks like the one of the gen 1.

In their video tutorial, @9:25, they say that you are supposed to install and slightly tighten the front shaft but they don't say when and how much to tighten it in the rest of the video:
In the "tutorials and technical" page of their website there is a document named "Remove and install powertrain unit" and I think that the piece of information about it is written in the point #11 of that guide.
 

Aleksandar13

Well-known member
Likes
98
Location
Uk
Thanks for all the help , the shipment arrived 3 days early despite Christmas and today I’ve tackled the install. It was not to hard but also very finicky when it came to getting the power unit in or out , very tight !!
Bike is assembled all bar the body work as I’ve lost willpower , started and it works.
I don’t know if there is any information about bleeding the gen2 water system I couldn’t find anything but I’ve filled it up and squeezed the hoses started it up and all seemed ok! Any advice on this before it leaves the garage ?
 

Theo

Well-known member
Likes
149
Location
Italy
I don’t know if there is any information about bleeding the gen2 water system I couldn’t find anything but I’ve filled it up and squeezed the hoses started it up and all seemed ok! Any advice on this before it leaves the garage ?
From what I've understood and from your pictures above, your system should be the type which self bleeds:
New genuine water pump kit for self bleed
If I were in your shoes, before reinstalling the body kit, I would keep the bike on for a minute and then I would check the coolant level again.
 

Aleksandar13

Well-known member
Likes
98
Location
Uk
From what I've understood and from your pictures above, your system should be the type which self bleeds:
New genuine water pump kit for self bleed
If I were in your shoes, before reinstalling the body kit, I would keep the bike on for a minute and then I would check the coolant level again.
Thank you I’ve seen that video online as well, was just wondering why there isn’t an updated stark video … looking at that i guess the gen 2 has an auto bleeding sytem and there is no need to anything else apart from topping up after the bike has runs for a few minutes !
 
Similar threads

Similar threads

Top Bottom