doates625
Member
- Likes
- 23
- Location
- Amherst, NH
Stark Varg Ice Racing Build
Detailed build documentationIntroduction
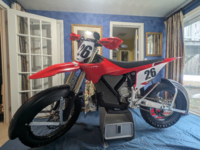
In January 2025, I converted my Stark Varg into an ice bike for racing on frozen lakes. This post documents my build in fine detail so that others can replicate it with less struggle, and maybe even improve upon it, and so that I can repeat my own work in case of damage. It documents both parts (with order links) and labor, with special emphasis put on the fine fabrication details which I had to improvise along the way through trial and error.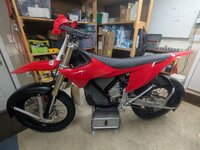
The target audience of this document is those entirely uninitiated to the sport of ice riding, as that is who I was when I started about a month ago. I will make some sweeping summaries of nuanced ice racing concepts to prompt the uninitiated to do further research. If I make any incorrect statements beyond the pedantic, please leave a comment and I will correct. For the well-versed, I recommend skimming the “Parts” section and skipping straight to the BOM. Finally, this post was copy-pasted from a Google doc, so please excuse any fucked up formatting I failed to correct.
Summary
The build consists of the following components:- Ice tires (with dedicated wheels)
- Ice tire wraps (for safety and screw life)
- Ice fenders (for safety only)
- Battery heater (for charging in cold temperatures)
Parts
This section details the parts which I used, what they are for, why I selected them, the degree to which they are needed, and links to order them. It ends with a full BOM.Ice Tires
How It’s Made
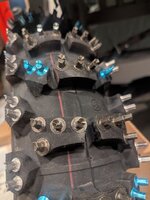
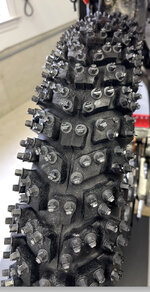
Ice tires are built by drilling special screws designed for grabbing ice into the knobs of dirt bike tires. Well-built ice tires typically also have additional shaved street tires inside, called “liners”, which allow for longer screws to be drilled in to prevent backing out and angle changes. For all the fine details of designing, building, and mounting ice tires, see this Ice Tire Basics PDF which was shared with me. By the time you are done reading, you will likely want to buy rather than build, but to each their own.Dedicated Wheels
Because ice tires use hard-compound motocross tires as a base and can contain up to 2 additional liner tires inside, they are absurdly stiff and notoriously difficult to mount. Add on the sharp screws which can slice skin on even a slight brush (ask me how I know) and mounting ice tires has been called a “Blood Sport”. For this reason, I highly recommend buying a dedicated set of wheels for your ice tires as you should expect a quality set to last several seasons (YMMV). I provide links to all of the necessary Stark Future wheel parts (down to the brake discs and bolts) in the BOM.Tire Selection
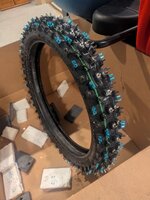
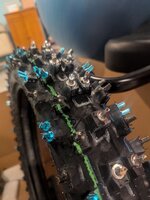
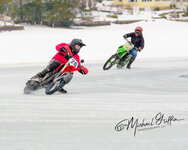
There are multiple options for purchasing pre-made ice tires, with the two primary classifications being AMA (American Motorcycle Association) and Canadian. Canadian ice screws are longer than AMA screws and therefore perform better when ice conditions are not ideal (e.g. when there is snow cover), but will bar you from competing in AMA events. I’m already deep down another competitive outlet, so I valued performance over competition legality. I selected Marcel Fournier Canadian ice tires on the basis of reputation. I was told “It’s what everyone in [my home state] runs.” Having completed my first test ride, I am definitely satisfied. They look gorgeous and grab like their lives depend on it (see “Demonstration” at the end).Oval vs Both Sides
On Marcel’s website, “Oval” means that the screws are set on the assumption that the bike will lean in only one direction (as one would on an oval-shaped track). “Both sides” means that the tire has screws on and can lean in both directions. The oval options use slightly less screws and therefore are about 10% cheaper. For the vast majority of use cases, I recommend “Both sides”.Front Tire
I selected the Marcel Fournier 21” Front both sides to match the Stark Varg 21” front wheel:The BOM also includes the Stark Varg 21” front wheel, brake disc, and mounting bolts. The second brake disc takes ease of wheel swapping to the extreme, and can easily be replaced by swapping the disc when swapping the wheel.
Rear Tire
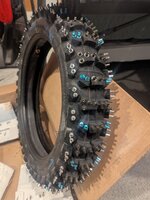
I selected the Marcel Fournier 18” Rear both sides to match the Stark Varg 18” rear wheel I purchased for enduro trail riding. I made this choice because I originally planned to build my own set of ice tires using my OEM 18” MX tire from Stark, and took delivery of my second 18” wheel before deciding to buy tires instead. If I were to start from scratch, I would order a 19” Rear both sides and the associated 19” Stark Varg wheel. However, this document describes “What is”, not “What could be”, so my photos, links, and BOM refer to the 18-inch variant:The BOM also includes the Stark Varg 18” rear wheel, brake disc, sprocket, and mounting nuts and bolts. Like with the front wheel, the second brake disc and sprocket can be skipped at the financial discretion of the builder.
Ice Tire Wraps
Ice tire wraps are thick strong fabric covers which wrap around the front and rear ice tires during transport to prevent wearing out the sharp (and expensive) ice screws. They also prevent accidental injury while handling the tires (again, ask me how I know). I ordered mine from Fredette Racing Products (hereon “FRP”) on the basis of recommendation. I recommend the “Velcro closer” variant (Part # 07-icewrap18/19-21) as they are higher quality, easier to use, and negligibly cheaper.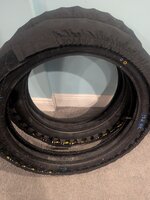
FRP could not explain to me why someone would ever buy the Moose version on the phone…
Ice Fenders
Ice fenders are mounted at each axle with the unsprung mass and serve as an additional safeguard against human to ice screw contact during transport, maintenance, and (most importantly) crashes while racing. Most official events and private landowners strictly require them. I purchased both the fenders and fender frames kits from FRP. Specifically, I purchased the black fender for the front and wide black fender for the rear, along with both front and rear frame kits (see BOM for details). Some precise details on how I mounted the fenders will come in the “Labor” section.Battery Heater
The Stark Varg Owners Manual mentions under “DANGER” three times: “Do not charge a battery at temperatures below 4°C (40°F)”. I store my Stark Varg in an unheated garage in a cold state where temperatures can hit single digits (*F), so a battery heater was mandatory for me. In my search, I came across this thread in the Electric Dirt Riders forum which posted Chicken Hawk Racing (CHR) Stark Varg battery warmers for sale. While I didn’t find the thread in time to exploit the sale, I did contact CHR and ordered my own for a much steeper price. There are definitely cheaper solutions to this problem going all the way down to duct-taping a heated blanket to the battery. Regardless, I am very satisfied with my purchase and have successfully charged my Stark Varg in sub-freezing temperatures at both low-power and high-power: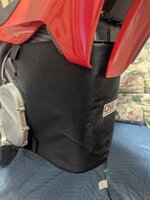
The heater heats to 70°F and the light turns from amber to green when above 60°F, well within the ideal charging temperature range of the lithium-ion battery.
BOM
This table lists all parts purchased with this build with order links, quantities, and prices. Shipping costs and taxes are variable and thus not included. I suggest deciding exactly what to order (if anything) from Stark Future in advance and placing a single bulk order as the prices of many of the parts are dwarfed by one-time shipping fees. This advice applies to a lesser degree to FRP and Marcel Fournier.Labor
Ice Tires
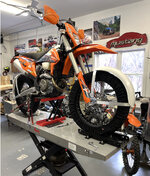
As discussed in the “Parts” section, mounting ice tires is a blood sport. I personally attempted and gave up at 10 PM after cussing at my Tusk tire changing stand for over an hour. I then took it to a friend who had built a custom ice tire oven consisting of a space heater tubed into a cardboard box. He left each tire in the oven for 30 minutes then mounted them in minutes with his friend and a bit of lackey help from me. I later learned they once mounted 30 ice tires in a week. Thus, my advice is to either become an expert, know an expert, or pay an expert, most likely one of the latter two. I owe my local expert a few beers. Both tires are directional, and getting the direction right is extremely important due to the pain and effort involved in mounting. For the Marcel Fournier tires, the direction of rotation is marked with an arrow along with the recommended PSI in blue ink on the sidewalls.Ice Tire Wraps
Once the ice tires are mounted, immediately wrap them and keep the wraps on until touching down on the ice, to both protect both the tire and yourself. Re-wrapping tires once the fenders are installed is tricky - having a friend available who can toggle the brakes helps quite a lot.Fork Guards
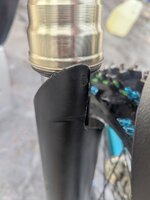
The Marcel Fournier Canadian ice tires are wide enough that the outer screws scrape against the inside of the fork guards. To account for this, use a grinder to shave off the upper inside of the fork guards as shown below:I recommend cutting straight down the center of each guard until 1-2 cm below the divet, then cutting diagonally down to the inside parallel to the divet. If done well, this can actually be a stylistic enhancement and subvert the desire to buy a new set of fork guards in the Spring. This is of course in my humble opinion, and if I give into temptation and buy a second set of fork guards in the Spring, I will add them to the BOM accordingly.
Ice Fenders
The FRP fender frame kits come as kits of parts with printed assembly instructions including the tools needed. The images and listed tools on the website, along with the printed instructions, were enough for me and my mediocre mechanical mind to get the frames put together. The following subsections for the front and rear fenders include photographs of the printed instructions along with creative tricks I employed specific to the Stark Varg.Front Fender
The Front Fender assembly instructions from FRP are shown below:
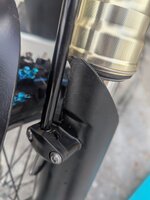
The hardest part of assembling the front fender is doing it in such a way that there is no rotational play along the axis of the wheel axle. The website shows a second bolt mounted to a threaded hole in the front brake caliper to solve this problem. Unfortunately, the equivalent threaded hole in the Stark Varg brake caliper is far too recessed for the provided bolt to reach. This also makes the provided spacers insufficiently long, and measuring the exact position to drill a daunting task. I subverted all of this by simply bending the elongated bracket inward until it reached under the caliper. When fully assembled, this prevents the fender from rotating down, as shown in Circle 1:
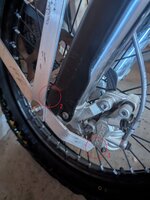
The vertical bracket is then pressed up against the black fork guards as shown in Circle 2 above. How far back it can go is sensitive to the tightness of the lock nuts on the threaded rod, so make sure they are tightened with washers installed such that there is no gap between the fender brackets and the forks. When fully assembled, this pressure prevents the fender from rotating up, which, when combined with the constraint from Circle 1, completely restricts the fender rotation through compression. In practice this works extremely well. I am unable to move the fender with my hands, and it held up to almost 30 minutes of hard ice riding and several crashes.
The rivets between the fender and the frames must be installed in-place on the bike so that the precise compression is maintained. I suggest the following sequence:
- Remove the OEM front fender (red, gray, or white)
- Drill and mount the center rivet in the vertical bracket
- Drill and mount the center rivet in the horizontal bracket from the front while:
- Pushing back on the vertical bracket and
- Down on the horizontal bracket
- Drill and mount all 4 side rivets (this should be easy)
- Reinstall the OEM front fender
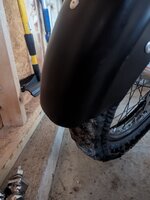
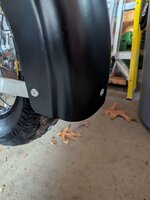
Without this, when cornering at the limit, the fender will collide with the ground, pushing up the front wheel and causing a crash (ask me how I know, and yes, you will learn that far).
Rear Fender
By comparison, the rear fender is far simpler to install. There are no significant deviations from the printed instructions, which are provided below: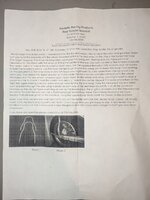
As with the front, I recommend shaving off the bottom of the rear fender such that there is about 1 inch between the edge of the fender and the bottom edge of the bracket on the inside, as shown:
