- Likes
- 2,799
- Location
- Pennsylvania
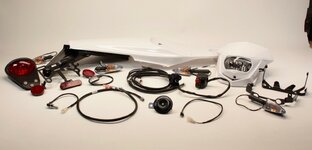
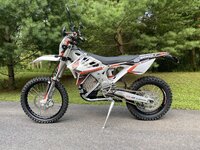
I'll take this opportunity to share my recent experience of converting an MXR to an "EXR", or rather adding the lighting equipment to MX/MXR's. So some of you may know that Liquid Performance sells an "Alta Motors EX/EXR Conversion Kit" on eBay (contact @ayden_kry if you have any questions on the kits). With these kits you can add all the lighting required to make your MX or MXR DOT road lighting legal.
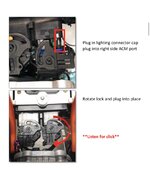
Now the first step is to install the main lighting harness that plugs into the ACM. To do this correctly you will need to remove the battery. I'm not going to go into the details of how to remove the battery here, for that you can search the archives for past discussions. Once you have the battery out you will need to remove the dummy plug from the ACM. This is the right side plug if viewing from the riders position. Now you can install the main lighting harness into the ACM.
Once the main harness is connected to the ACM you can start routing the wires to their respective locations. The two main long lengths of harness needs to go to the front of the bike, you will need to remove the delta wing (charge port plastic housing) and add one of those on either side, adding to the existing wires already going to the front. The length that has the large 3 prong connector goes on the left side, the other on the right. Note how the existing wires are routed up under the bike, and try and follow the same route. Also note there will be a thin cloth like band on those two sections of harness that go front, that band indicates where you should zip tie that section together with the existing harness to the frame. Take your time and make sure you route all your wires cleanly and avoid any potential pinch points or anything that may damage any of the wiring. This is very important! Re-route as necessary to keep things nice and tidy.
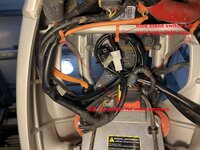
Below picture illustrates zip tie locations for left and right harness sections that route to the front of the bike. Also shown is the location I wrapped up and secured the kick stand switch and the rear brake light plug (more on that to come). If analyzing this picture for further routing direction, note that the position of the rear lighting harness plug is incorrect in this picture, so do not use that as a guide.
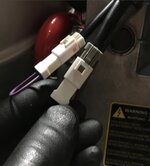
Now the next step is to connect the existing plugs for the rear brake light switch and the kickstand switch to the main lighting harness. These are part of the existing main harness and one of them will currently have a dummy plug, and the other will have a jumper plug installed. These will need to be removed and then plugged in to the new main lighting harness.
Once you have connected those plugs to the main harness you will have a few options to consider. Are you running a kickstand and if so do you also want to utilize the kickstand safety switch? Are you installing the rear brake light pressure switch and if so do you have a LHRB kit installed and removed the pedal brake? The kickstand safety switch is a magnetic switch that installs onto the kickstand assembly, and its purpose is to disable the bike from going live until the kickstand is raised. The rear brake light pressure switch is installed by replacing the banjo bolt into the reservoir of the rear pedal brake, so if you installed a LHRB kit and eliminated the pedal brake, you will either have to lengthen the wires of the pressure switch and install it into the connection at the rear caliper, or just not install it (not DOT legal then obviously). I also need to note that at this time the kickstand switch is not part of the kit that Liquid sells and you will need to purchase it separately. Also you cannot just not install it, you have to have it plugged in and wrap it up out of the way or you will get the kickstand down warning when you try and make the throttle live. On my install I did not want the kickstand switch installed, and I did not connect a rear brake light switch, so I carefully wrapped up and tip tied them out of the way as indicated in the earlier picture.
Next step will be to route the connection to the rear lighting harness, below is the route I used, if any EX/EXR or SM guys want to compare to the factory routing please do! The rear harness routes between the subframe and the fender, so the fender will need to be removed. You may want to take this opportunity to clean out the inevitable mini garden of dirt you have accumulated in the subframe. The harness route through the subframe should be very obvious by all the molded notches back to the rear designed just for it. You will have to temporarily attach the rear taillight/fender assembly while you attach the rear harness to the lights and turn signals as it is normally held in place by the rear fender hardware.
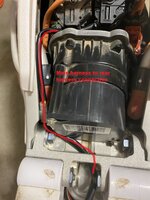
At this point you can install the battery back in the bike, or wait. Your choice.
Continuing working towards the front you can now reinstall the delta wing, being careful not to pinch the harness in any way. Once that is done now it's time for the headlight, front turn signals, horn, front brake light switch and handlebar multi-switch. The front brake light switch is a small switch that just simply clips onto the front brake master cylinder to the already machined pad. To do this remove the rubber cover and clip it in place. What I found out was that it did not come close to contacting the lever on my MXR. After some researching it would appear that the factory road bikes do not have a small spring installed that takes up the clearance to the point where the lever actually contacts the piston plunger on the master cylinder. Anyone with an EX or EXR that would like to share a picture of theirs I'd love to see it. Anyway, to remedy this without removing the spring and altering my lever position, I made a 3D printed piece to act as a shim to take up the clearance and contact the switch properly. Then I simply attached it to the lever with some 3M double sided tape. If you want to print one you can download my design HERE .
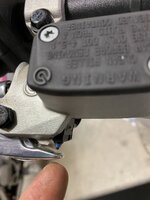
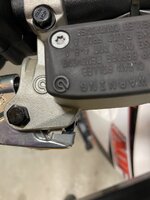 Now route your brake switch along the bars securing at the zip tie points and proceed with the multi function bar switch on the other side, securing the wires along the handlebars and routing towards the front center of the bike.
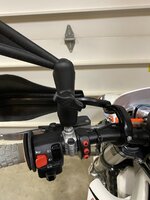
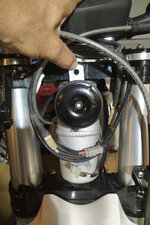
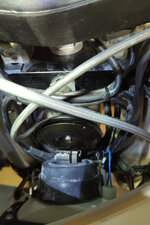
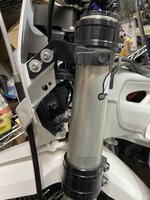
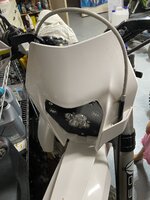
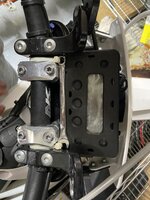
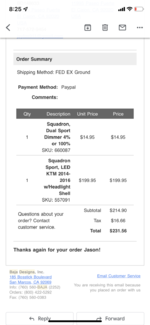
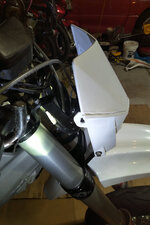
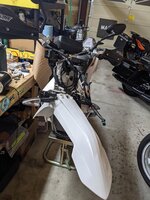
Headlights and turn signals. Now if you are installing the OEM Alta Headlight and turn signals, you just replace the lower front fender brace with new one that has the mounting points for the turn signals and headlight, and the new upper bracket that also serves as the display mount on the road bikes. You also will need to replace the front brake hose with the longer unit used on the EX and EXR's, as the MX version wont work with the stock headlight. You can get the hose through Liquid Performance as well. Now my bike I had converted to the KTM front fender, so I couldn't use the Alta turn signal mounts unless I wanted to cut up the bracket. What I did was opt to use a KTM headlight to go with my KTM front fender. I got a complete new knock off headlight assembly off eBay for like $40. It then locates into points molded into the KTM fender. The included rubber straps didn't work out though, so what I did was designed some 3D printed upper headlight mounts that utilize the mounting points on the top triple clamp as well as my own turn signal and front brake hose guide. Again, you can download my design HERE . With this headlight and mounting brackets you can retain the shorter MX front brake hose as well. I also mounted my horn to the left side of the headlight as shown in the pictures.
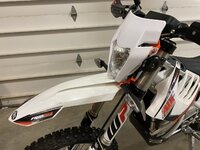 As far as the wiring, mindfully add the excess length of lighting harness to the loop of harness already tied together in front. Connect your turn signals headlight and horn. Turn the bars lock to lock with everything installed and watch for any pulling, binding or pinching. Again, take your time, damaged/broken wires can be a PITA to locate. Anyone who would like to take a picture of their OEM Alta wiring behind the headlight to add to this post please do!
Power the bike on and check that everything functions. Now stand back and admire your work. That was the easy part, now you have to deal with your states DMV!

Now the first step is to install the main lighting harness that plugs into the ACM. To do this correctly you will need to remove the battery. I'm not going to go into the details of how to remove the battery here, for that you can search the archives for past discussions. Once you have the battery out you will need to remove the dummy plug from the ACM. This is the right side plug if viewing from the riders position. Now you can install the main lighting harness into the ACM.

Once the main harness is connected to the ACM you can start routing the wires to their respective locations. The two main long lengths of harness needs to go to the front of the bike, you will need to remove the delta wing (charge port plastic housing) and add one of those on either side, adding to the existing wires already going to the front. The length that has the large 3 prong connector goes on the left side, the other on the right. Note how the existing wires are routed up under the bike, and try and follow the same route. Also note there will be a thin cloth like band on those two sections of harness that go front, that band indicates where you should zip tie that section together with the existing harness to the frame. Take your time and make sure you route all your wires cleanly and avoid any potential pinch points or anything that may damage any of the wiring. This is very important! Re-route as necessary to keep things nice and tidy.
Below picture illustrates zip tie locations for left and right harness sections that route to the front of the bike. Also shown is the location I wrapped up and secured the kick stand switch and the rear brake light plug (more on that to come). If analyzing this picture for further routing direction, note that the position of the rear lighting harness plug is incorrect in this picture, so do not use that as a guide.

Now the next step is to connect the existing plugs for the rear brake light switch and the kickstand switch to the main lighting harness. These are part of the existing main harness and one of them will currently have a dummy plug, and the other will have a jumper plug installed. These will need to be removed and then plugged in to the new main lighting harness.

Once you have connected those plugs to the main harness you will have a few options to consider. Are you running a kickstand and if so do you also want to utilize the kickstand safety switch? Are you installing the rear brake light pressure switch and if so do you have a LHRB kit installed and removed the pedal brake? The kickstand safety switch is a magnetic switch that installs onto the kickstand assembly, and its purpose is to disable the bike from going live until the kickstand is raised. The rear brake light pressure switch is installed by replacing the banjo bolt into the reservoir of the rear pedal brake, so if you installed a LHRB kit and eliminated the pedal brake, you will either have to lengthen the wires of the pressure switch and install it into the connection at the rear caliper, or just not install it (not DOT legal then obviously). I also need to note that at this time the kickstand switch is not part of the kit that Liquid sells and you will need to purchase it separately. Also you cannot just not install it, you have to have it plugged in and wrap it up out of the way or you will get the kickstand down warning when you try and make the throttle live. On my install I did not want the kickstand switch installed, and I did not connect a rear brake light switch, so I carefully wrapped up and tip tied them out of the way as indicated in the earlier picture.
Next step will be to route the connection to the rear lighting harness, below is the route I used, if any EX/EXR or SM guys want to compare to the factory routing please do! The rear harness routes between the subframe and the fender, so the fender will need to be removed. You may want to take this opportunity to clean out the inevitable mini garden of dirt you have accumulated in the subframe. The harness route through the subframe should be very obvious by all the molded notches back to the rear designed just for it. You will have to temporarily attach the rear taillight/fender assembly while you attach the rear harness to the lights and turn signals as it is normally held in place by the rear fender hardware.

At this point you can install the battery back in the bike, or wait. Your choice.
Continuing working towards the front you can now reinstall the delta wing, being careful not to pinch the harness in any way. Once that is done now it's time for the headlight, front turn signals, horn, front brake light switch and handlebar multi-switch. The front brake light switch is a small switch that just simply clips onto the front brake master cylinder to the already machined pad. To do this remove the rubber cover and clip it in place. What I found out was that it did not come close to contacting the lever on my MXR. After some researching it would appear that the factory road bikes do not have a small spring installed that takes up the clearance to the point where the lever actually contacts the piston plunger on the master cylinder. Anyone with an EX or EXR that would like to share a picture of theirs I'd love to see it. Anyway, to remedy this without removing the spring and altering my lever position, I made a 3D printed piece to act as a shim to take up the clearance and contact the switch properly. Then I simply attached it to the lever with some 3M double sided tape. If you want to print one you can download my design HERE .

 Now route your brake switch along the bars securing at the zip tie points and proceed with the multi function bar switch on the other side, securing the wires along the handlebars and routing towards the front center of the bike.
Headlights and turn signals. Now if you are installing the OEM Alta Headlight and turn signals, you just replace the lower front fender brace with new one that has the mounting points for the turn signals and headlight, and the new upper bracket that also serves as the display mount on the road bikes. You also will need to replace the front brake hose with the longer unit used on the EX and EXR's, as the MX version wont work with the stock headlight. You can get the hose through Liquid Performance as well. Now my bike I had converted to the KTM front fender, so I couldn't use the Alta turn signal mounts unless I wanted to cut up the bracket. What I did was opt to use a KTM headlight to go with my KTM front fender. I got a complete new knock off headlight assembly off eBay for like $40. It then locates into points molded into the KTM fender. The included rubber straps didn't work out though, so what I did was designed some 3D printed upper headlight mounts that utilize the mounting points on the top triple clamp as well as my own turn signal and front brake hose guide. Again, you can download my design HERE . With this headlight and mounting brackets you can retain the shorter MX front brake hose as well. I also mounted my horn to the left side of the headlight as shown in the pictures.
 As far as the wiring, mindfully add the excess length of lighting harness to the loop of harness already tied together in front. Connect your turn signals headlight and horn. Turn the bars lock to lock with everything installed and watch for any pulling, binding or pinching. Again, take your time, damaged/broken wires can be a PITA to locate. Anyone who would like to take a picture of their OEM Alta wiring behind the headlight to add to this post please do!
Power the bike on and check that everything functions. Now stand back and admire your work. That was the easy part, now you have to deal with your states DMV!

Last edited:

