Rear hand brake doesn't work after replacement on Varg EX

notna

Member
Likes
24
Location
California
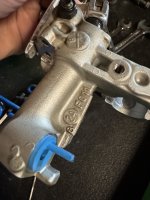
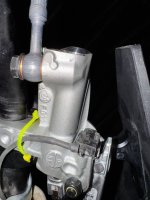
Received my bike today and spent a lot of time assembling it along with swapping foot break with a hand break. There's no official guide on how to do it so I had to follow a couple of random youtube videos. At the end my hand rear break does not work.

I'd really appreciate some advice on what I could've done wrong. Keep in mind this is the first time I'm doing such kind of work on a bike.

What I did:
- Removed foot brake pedal
- Removed the brake pump after disconnecting it from the brake caliper
- Disconnected the thin black cable (power?)
- Connected the left hand brake directly to the break caliper passing the cable all the way through the body of the bike
- Connected the black wire from the left hand brake to the wire box

While doing it I also unscrewed the little bolt from the caliper and leaked a little bit of oil. I screwed it back in.

What are all the mistakes I've done?
 

dezinfo

New member
Likes
0
Location
Ukraine
То есть тот факт, что тормоз нажимается слишком легко, должен был подсказать мне, что я не прокачал тормоз как следует?
Я достаточно прокачал систему, но эффективность заднего тормоза всё равно слабая. Нужно приложить максимальное усилие, чтобы заблокировать колесо. Хотелось бы, чтобы он работал как передний. При умеренном усилии тормозит максимально эффективно.
 

DaveAusNor

Well-known member
Likes
86
Location
Norway
Я достаточно прокачал систему, но эффективность заднего тормоза всё равно слабая. Нужно приложить максимальное усилие, чтобы заблокировать колесо. Хотелось бы, чтобы он работал как передний. При умеренном усилии тормозит максимально эффективно.
2 things. The front brake is a double piston, and its clamping on a 260mm disc as opposed to a 220.
Unless you upgrade the rear disc or caliper you won't get the same braking force as the front brake. I'd suggest increasing regen if you want more braking in the rear.
 

AL_V

Well-known member
Likes
272
Location
Canton, Ohio
So the fact that squeezing the brake is too easy should have told me that I haven’t bled it properly? Alright
If you can pump up the pressure and resistance by repeatedly pumping the lever, it shows that there is air in the system.
It can be very time consuming, but best way to bleed is 2 syringes back and forth.
Also there should be no areas of the brake line "up higher" that the master cylinder, this will trap air.
Another tip: After it is bled as well as you can, pump the lever a few times, then zip tie it or otherwise tie it to the grip overnight, or even better when you haul the bike.
This can help the air bubbles rise to the reservoir.
There is a lot of info on youtube, and here in the Alta section where they talk about adding the LHRB.
 

Border Dave

New member
Likes
3
Location
Bellingham, Washington
I just installed my left hand rear brake yesterday and used a $15 vacuum bleeder kit from Amazon. I started by removing the cap from the lid of the master cylinder and filled it with normal automotive Dot 4 brake fluid. I then attached the vacuum hose on the bleeder to the bleeder bolt on the caliper. Then, I pumped the vacuum bleeder until the negative pressure (vacuum) read about 15 to 20. I then slightly opened the bleeder valve on the caliper. A lot of air and a little brake fluid began to flow into the bleeder hose and then into the catch bottle. As the vacuum decreased on the bleeder gauge, brake fluid was pulled from the master cylinder and the level began to drop. As it dropped, my son was refilling it with fresh brake fluid to keep topped off. Before the vacuum got to zero, I closed the bleeder valve on the caliper; then I squeezed the vacuum bleeder handle until the gauge again read 15-20. I again re-opened the bleeder valve on the caliper and let brake fluid and air through the line. When the bottle got full of brake fluid, I emptied it into the fresh bottle of brake fluid that my son was holding. I kept doing this until it looked like no more air was coming out of the bleeder valve.

I replaced the cap on the master cylinder and squeezed the brake lever. The lever was soft and would go all the way to the handgrip, with a little resistance at the end. I kept pulling the lever and flicking it many times to allow air bubbles in the line to rise to the master cylinder. After a few minutes, the brake was able to hold the rear wheel if I attempted to spin it by hand, but the lever feel was still too soft. Here's the money maker, folks: I then pulled the brake lever as far as it would go (almost to the grip) and zip-tide it in place. I allowed it to stay that way overnight. A few times along the way I would take a small hammer and tap on the caliper multiple times and tap the brake line with something lighter. I only had to do this a few times. Once or twice that day and then twice the next day. Around 3:00 pm the next day I removed the zip tie and Viola! The brake lever has great feel and stops that bike tire like a big dog!

EDIT: I know there are other ways and other tools to do the job. Some will say that using a vacuum bleeder to pull air all the way DOWN through the line is doing it the hard way. That's true, but it worked! :)
 

DaveAusNor

Well-known member
Likes
86
Location
Norway
Some will say that using a vacuum bleeder to pull air all the way DOWN through the line is doing it the hard way. That's true, but it worked! :)
I've never tried this method, great that it worked for you. I've always just injected brake fluid from the caliper and caught any overflow from the reservoir. Air bubbles will naturally want to move up.
 
Top Bottom