MotoxXxMan
New member
- Likes
- 0
- Location
- Manchester, CT
New to the site, found it by reading the comments on Don Cox's youtube videos.
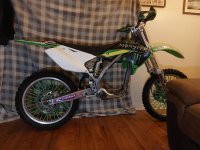
I raced motocross for several years in my teens and 20's, and have always had at least one street or dirt motorcycle my whole life since I was around 5. Well it's been a few years since I've been on two wheels, and it's time. I picked up this 2004 KX250F a couple weeks ago for $500 without a motor. I tore it down and closely inspected everything, and painted the frame while I was at it (knowing I'll be re-painting it later), making sure all was well. Needs new linkage bearings, new fork seals/bushings/oil, and chain slider, rollers, and guide pad. While apart, I cleaned everything, sharpened the pegs, fixed a few stripped threads, replaced several nuts/bolts, tightened the seat cover (it had wrinkles), greased steering and swingarm bearings, flushed and bled the brakes, straightened the rotors, torqued everything to spec, and made a list of misc small parts needed to make it complete and like new. Next steps will be ordering all the electronics, then while waiting for the shipments I'll buy all the other little misc stuff I need to restore the bike to like new. For a little under $1000 total including buying it, not including any electronics, I'll have this roller fully restored/rebuilt.
I will be going a bit bigger than the usual you see here, while still trying to keep weight down. So far, the plan is to use the following:
-QS 165 60H v3 (2.37 reduction gears, 520 sprocket 14 or 15 tooth)
-Fardriver ND841200 controller, with added heatsink
-building my own battery, size tbd, but so far I'm thinking 22s, and 10p-12p. Using Molicel p50b cells, ANT BMS 17s-24s 340a continuous 850a peak, QS10 connector(s), and WellGo 0.5mm copper busbars.
Will be setting it around 350amps continuous, 450-500amps peak discharge. Largely depends on what test rides reveal for my satisfaction with power, and motor/controller/battery temps. If I don't get the power I want, I'll just rebuild the battery a little bigger and turn the juice up, and possibly add a water cooling plate to the controller. May even speak with QS/Sia about a water cooled version of the motor.
I have no idea what to get for a charger, or where. I could use some help with this. I'd like something in the 10a-20a range, basically whatever the highest current I can get for a standard 110v US wall outlet. I'd like to keep cost down on the charger, so I'm ok wil it being dedicated to a specific voltage. But if price is right, I'd really like something that can do 22s/23s/24s.
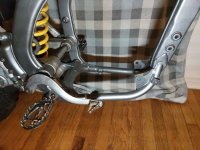
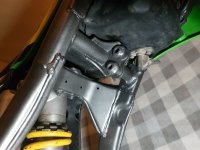
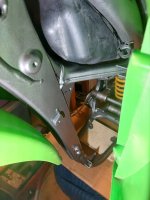
The top rear motor mount and bar on the frame will be getting cut out. The bottom front motor mount tabs will be getting removed. The front upper spar will most likely be getting cut where I drew the black line, and I'll extend the braces and weld them further forward so all original structure is intact but allowing for a MUCH larger battery cavity.
I've been a welder/fabricator as a performance auto tech/tuner for the past 20+ years, so fabrication such as this is a walk in the park for me. Once completed, it'll get a re-paint, and look as if it came from the factory as an electric. Honestly, it'll look better than factory, cuz my gosh the welds on this frame are ridiculously chunky and sloppy, with tons of spatter everywhere too. This is a steel frame btw.
To attach the QS165, I'll be adding steel tabs to the lower front of the frame to bolt directly to the motor, and making 6mm alum ">" shaped brackets on the two rear mount tabs on the motor where the left side will go to a 22x17 sleeve on the swingarm, and the right side will get a steel tab welded to the frame. According to my measurements, the right side of the rear motor mounts are further right than the inner edge of the swingarm, so instead of bending a bracket to reach the swingarm bolt, I think it'll be stronger to just go directly to the frame.
Controller will go in the airbox. And depending on what space is left around the battery, I want to try building some form of ducting from the radiator shrouds to the airbox to help cool the controller.
I'll probably be getting a 3" TFT display to mount on the bar (same display as the Ventus One+ has). If not, I'll mount a small ANT BMS LCD display where the gas cap is.
I'm not rich, so this build is going to take a while, possibly up to a year.


Last edited:
