Want to buy Factory Alta left hand rear brake kit


synics

Well-known member
Likes
66
Location
New Jersey
Hey, I've overfilled too, at both ends - I think enough slopped out that I got lucky with the drag thing. Before going to the trouble of rebuilding, I'd check the caliper guide rods for grease - I wouldn't be surprised if it's burnt to a crisp, leaving 'dead-grease glue' on the rods, As long as the caliper & piston move freely and don't leak, you might be OK. The new pads will likely be thicker, and almost always I've had to slide the caliper way apart and push the piston(s) farther into the body before the new pads would go on. After that, a couple of strong brake applications and I've always ended up with zero drag after a pad change.
Yeah that's a good point I was thinking about that this morning too. I mean when you look back and there's smoke coming off of your brakes yeah, it's a good chance any grease is gone, lol. So do you just have to slide those rubber boots to the side and put grease on it is that all?
 

rayivers

Well-known member
Likes
558
Location
CT, USA
So do you just have to slide those rubber boots to the side and put grease on it is that all?

Yes, pretty much. If the wheel's still on the bike w/pads out, see if you can move the LH caliper side/pad holder side-to-side - it should move easily with a greasy feel. If it doesn't (and going from memory)... with the wheel off, I believe I pulled the RH side of both rubber boots off the caliper body, then slid the LH side/ rods out of the caliper as far as possible (maybe it comes out all the way? which would be ideal), then cleaned & greased it well, working it in & out till it felt smooth and well-lubed. This would also be a good time to push the caliper piston in to see if it's free enough (mine have always had a lot of stiction, even when new; but if you can't get it to budge - or it's loose and weeping, indicating burnt seals - that's not good. If you want you could put in both pads temporarily and use the pedal, which should instantly move the piston the width of the rotor without any real resistance - after which you could remove the pads and see if pushing the piston in from the new position was any easier.
 

synics

Well-known member
Likes
66
Location
New Jersey
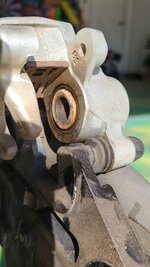
So just took this picture and it looks like there's a little weeping at the bottom. Crap. I don't know if you can see it in this picture or not I just attached. But yeah the caliper moves back smoothly and when I push it in it goes back out with no problem. But I'm not liking seeing that little bit of dampness. Maybe I'll just get a rebuild kit and do it, might as well I have it all apart I'm going to have to rebleed it all over again. 20230320_163752.jpg
 

rayivers

Well-known member
Likes
558
Location
CT, USA
So just took this picture and it looks like there's a little weeping at the bottom... Maybe I'll just get a rebuild kit and do it, might as well I have it all apart I'm going to have to rebleed it all over again.

Thanks for the pic, and I agree, probably best to rebuild. That piston and the surrounding area looks truly baked. I believe a 26mm rebuild kit for a '13-'22 KTM 250 SX-F should work, but I've never done it myself so I don't know for sure. It'll be good to get rid of every last drop of burned fluid too.
 

C5tor

Chief Comedic Instigator
Likes
1,720
Location
SF Bay Area, CA
Yeah what I did was put too much fluid in the master cylinder right up to the top like a total idiot. I completely fried my pads and the rotor. Ordered new ones yesterday. I'm kind of worried though because now the pads don't fully retract in the drag on the disc a little bit and I don't know if I need to rebuild the caliper or not.
Just a comment, but I had a similar problem last year. It happened just after I switched over to some Midwest Mountain Engineering levers. I liked the levers in general, but I often found that the rear brake was dragging, and the rear brake would overheat from time to time.

After some fiddling, I discovered that the little pushrod that comes with the brake lever was binding and getting stuck, holding the brake slightly closed. The lever wasn’t binding, but the pushrod was. If I recall correctly, my conclusion was that the pushrod was a tad bit too short, causing the rod to bind in the recessed cup on the lever. I discussed the situation with MME. They agreed that a longer pushrod would probably reduce the angle of the rod coming out of the cup and resolve the issue.

Anyway, rather than messing around with fabbing up another pushrod, I just switched back to the stock Brembo lever, and the problem went away immediately. Just thought I’d mention it.
 

synics

Well-known member
Likes
66
Location
New Jersey
YES! I'm using that lever, and I realized that I need to use the KTM stock plunger and NOT the one it comes with. I have zero problems when doing that. But I also noticed that for some weird reason I CAN NOT bleed the brakes when using the Midwest lever. I have to use the stock lever. I know that makes no sense, but I just what I've discovered.
 

synics

Well-known member
Likes
66
Location
New Jersey
What I ended up doing is just buying the brembo Master clutch cylinder with the 9 mm opening (Not10mm), and then getting a hydraulic line made up from Spiegler to go right to the rear brake and it works perfectly. I can give you measurements if you need them.
 

dyedaniel

Member
Likes
7
Location
Hood River, OR
What I ended up doing is just buying the brembo Master clutch cylinder with the 9 mm opening (Not10mm), and then getting a hydraulic line made up from Spiegler to go right to the rear brake and it works perfectly. I can give you measurements if you need them.
Nice, do you have part numbers for the Brembo? It would be great to get the measurements as well.
 

synics

Well-known member
Likes
66
Location
New Jersey
The lines needs to be 67 inches long, with an M10x1.0mm normal non-inverted flare fitting. You need the 90° banjo bolt on the one end. Get the swivel on the other end if it's an option. When you go to the Spiegel site, you just do the walk-through process of making a custom line and it's pretty easy. You also want to make sure you ask for the hard piece to go over it starting about 3 in from the end to clip into the holder on the swing arm. They'll email you and get it sent out within a week.

 
Top Bottom