Lights!


pap

Member
Likes
11
Location
Nj
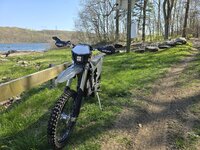
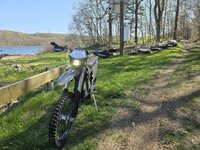
Heres my solution to getting front headlights and a rear tail light/brake light. I ordered the baja designs headlight through Desert Unlimited. They retrofit a battery and wiring behind the headlamp. I made my own wiring to connect the battery to the taillight and brake light. The tailight i got from Speed Moto and is the Universal Supermoto Rear Fender LED. I wired it so that the tail light only goes on when the headlight is turned on. So, it's off in the woods and on in the streets. I used a micro switch for the handbrake to activate the tail light. I may swap the white number plate(sticker) to a gray to match.

Im hoping there will be a more integrated design and wiring for a headlight and tail light in the future, but this works great for now!

20240423_153836~2.jpg

20240423_153815.jpg

20240423_153759.jpg
 

Torqu3

Active member
Likes
31
Location
MA
Looks good! Also, FYI there is 12v available on the bike without cutting into the factory harness if you need it. I'm in the process of getting all of my street legal gear set up. I'm going to be running a motogadget for all the low voltage control and switching etc.
 

pap

Member
Likes
11
Location
Nj
Looks good! Also, FYI there is 12v available on the bike without cutting into the factory harness if you need it. I'm in the process of getting all of my street legal gear set up. I'm going to be running a motogadget for all the low voltage control and switching etc.
Sounds great! Are you utilizing the amphenol connector?
 

mike61

Well-known member
Likes
59
Location
Germany
The place and fixing the battery?
Which microswitch?
How/where did you fix the wires for the rear lights?
 

pap

Member
Likes
11
Location
Nj
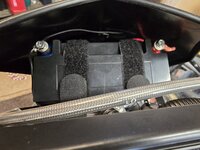
The battery is set behind the headlight
1000006276.jpg
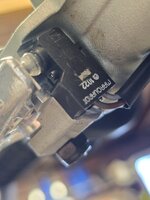
The microswitch I used is part number 50311050100 and is for the right hand front brake. You can get a microswitch for the left hand rear brake too.
1000006272.jpg
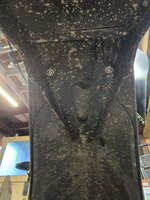
The tail light wiring goes under the taillight bracket and up through the inner rear fender. It's basically sandwhiched between the inner fender and outer rear fender. It then runs along the upper frame and terminates behind the new headlight.

1000006273.jpg
 

Jocke_D

Well-known member
Likes
49
Location
Sweden
Looks good! Also, FYI there is 12v available on the bike without cutting into the factory harness if you need it. I'm in the process of getting all of my street legal gear set up. I'm going to be running a motogadget for all the low voltage control and switching etc.

Care to share where you'll find a proper 12V supply ?
 

Torqu3

Active member
Likes
31
Location
MA
Care to share where you'll find a proper 12V supply ?
I don't have much prepared right now to share but I can tell you if you look at the back of the VCU plug, you will see a number of rubber/silicone plugs blocking off unused terminals. A number of them appear to be a small gauge and likely signal connections grouped on one side, but there are two larger plugs on the other side. The two larger ones are 12V+ and GND. The 12V appears to be up and stable shortly after turning the bike on (5-10 seconds). It's likely best to turn the bike on, let everything fully boot and stabilize for a few seconds and then draw power from the 12V circuit. There is a 12V output on other terminals that powers the water pump and possibly other items on the bike. I was able to find the VCU connector part number on mouser and the associated pins that can be used to insert into these unused positions. After some other digging around it looks like there is about 125-150W total on the 12V rail, but the bike needs some power, so there is likely about 50-75W of power available. It should be enough for LED signals, brake, LED headlight (25-35W) and a small horn. I had to buy a roll of 100 pins since it was the minimum quantity. Please proceed with caution and verify this yourself as well.

With a limited output charge controller and blocking diodes, you could trickle charge a 12V battery like the one shown above so you stress the bikes 12V system less and have higher available power for some duration. I'm likely going to just run directly off the 12V system first and see how it goes before adding any more battery weight to the bike.
 

Jocke_D

Well-known member
Likes
49
Location
Sweden
I don't have much prepared right now to share but I can tell you if you look at the back of the VCU plug, you will see a number of rubber/silicone plugs blocking off unused terminals. A number of them appear to be a small gauge and likely signal connections grouped on one side, but there are two larger plugs on the other side. The two larger ones are 12V+ and GND. The 12V appears to be up and stable shortly after turning the bike on (5-10 seconds). It's likely best to turn the bike on, let everything fully boot and stabilize for a few seconds and then draw power from the 12V circuit. There is a 12V output on other terminals that powers the water pump and possibly other items on the bike. I was able to find the VCU connector part number on mouser and the associated pins that can be used to insert into these unused positions. After some other digging around it looks like there is about 125-150W total on the 12V rail, but the bike needs some power, so there is likely about 50-75W of power available. It should be enough for LED signals, brake, LED headlight (25-35W) and a small horn. I had to buy a roll of 100 pins since it was the minimum quantity. Please proceed with caution and verify this yourself as well.

With a limited output charge controller and blocking diodes, you could trickle charge a 12V battery like the one shown above so you stress the bikes 12V system less and have higher available power for some duration. I'm likely going to just run directly off the 12V system first and see how it goes before adding any more battery weight to the bike.
Thanks. Really interesting!
One wonders if this is a preparation for the upcoming enduro model or just something else.

I would not recomend that you tap into the water pump because that is a monitored feed. If a higher than expected power draw is detected it is seen as a fault and the bike could shut down.
 

mike61

Well-known member
Likes
59
Location
Germany
As long as the factory don't offer a "free exit" I'm not brave enough to brake into the closed system.
Because of................surprises;-(
 

Torqu3

Active member
Likes
31
Location
MA
Thanks. Really interesting!
One wonders if this is a preparation for the upcoming enduro model or just something else.

I would not recomend that you tap into the water pump because that is a monitored feed. If a higher than expected power draw is detected it is seen as a fault and the bike could shut down
I'm sure they planned for future models with 12V needs, it would be short sighted not too.

I still haven't had a chance to install everything yet but I believe these are the correct pins. When I ordered they didn't have cut singles available but they do now. I'll have about 98 spares if anyone needs a couple. https://www.mouser.com/ProductDetai...uwKfdCFoHbQ==&countryCode=US&currencyCode=USD

This appears to be the VCU connector used: https://www.mouser.com/ProductDetail/Molex/64320-3311?qs=WeK9NnMzqvcb7xofj9yxAA==

Also if anyone wants normally open brake switches as opposed to the normally closed (inverted logic) that the brembo part numbers reference, here are the parts on mouser.
 

rayivers

Well-known member
Likes
558
Location
CT, USA
I don't have much prepared right now to share but I can tell you if you look at the back of the VCU plug, you will see a number of rubber/silicone plugs blocking off unused terminals. A number of them appear to be a small gauge and likely signal connections grouped on one side, but there are two larger plugs on the other side. The two larger ones are 12V+ and GND. The 12V appears to be up and stable shortly after turning the bike on (5-10 seconds). It's likely best to turn the bike on, let everything fully boot and stabilize for a few seconds and then draw power from the 12V circuit. There is a 12V output on other terminals that powers the water pump and possibly other items on the bike. I was able to find the VCU connector part number on mouser and the associated pins that can be used to insert into these unused positions. After some other digging around it looks like there is about 125-150W total on the 12V rail, but the bike needs some power, so there is likely about 50-75W of power available. It should be enough for LED signals, brake, LED headlight (25-35W) and a small horn. I had to buy a roll of 100 pins since it was the minimum quantity. Please proceed with caution and verify this yourself as well.

With a limited output charge controller and blocking diodes, you could trickle charge a 12V battery like the one shown above so you stress the bikes 12V system less and have higher available power for some duration. I'm likely going to just run directly off the 12V system first and see how it goes before adding any more battery weight to the bike.

Thanks much for taking the time to gather all that info, it'll help a lot of Stark owners.
 

tymck7

Member
Likes
6
Location
Idaho
This is awesome. I’m gun shy because i ended up trashing my zero fxs by tinkering too much. I now either have to replace the throttle, controller, or motor… in that order of cost :(. But this sounds sweet
 

FreedomFlyer

Member
Likes
6
Location
USA
Heres my solution to getting front headlights and a rear tail light/brake light. I ordered the baja designs headlight through Desert Unlimited. They retrofit a battery and wiring behind the headlamp. I made my own wiring to connect the battery to the taillight and brake light. The tailight i got from Speed Moto and is the Universal Supermoto Rear Fender LED. I wired it so that the tail light only goes on when the headlight is turned on. So, it's off in the woods and on in the streets. I used a micro switch for the handbrake to activate the tail light. I may swap the white number plate(sticker) to a gray to match.

Im hoping there will be a more integrated design and wiring for a headlight and tail light in the future, but this works great for now!
View attachment 11249

View attachment 11250

View attachment 11251
Wow looks sweet! Thanks for sharing. Man that light is expensive at almost $500!
Please, please, please put some kind of smooth frame on that license plate! Looks like a razor blade to the thigh if you fall off of a hill climb.
 

Similar threads

Top Bottom