Display Guard - Protect it from crashes!


Mark911

Well-known member
Likes
1,123
Location
Corona Ca
Here's an idea you guys with interest might what to try. Using cheap 90 degree prisms to show the display on edge. Most offroad guys are only interested in range and the two warning lights. putting the viewing area on edge would allow many other mounting options, perhaps directly behind the front number plate?

crude drawing. dash.png
 

Trialsman

Well-known member
Likes
600
Location
Pittsburgh
By now the site should be fixed and ready for anyone who is interested in protecting their display. I got the first two for my bikes, but there are about a hundred left to help out others. The website said 5# but in reality it is 10.6oz with the hardware. I will start going through the PMs and try to make sure anyone who expressed an interest gets one if they still want it. I packaged up some MX style today and will get the EX on Monday hopefully shipping them by the end o the day. What I hoped would be a quick project took a really long time to get to the point where I felt it was ready. Tomorrow I should finish up my carbon/Kevlar skid plate so I will soon need another project.
 

Trialsman

Well-known member
Likes
600
Location
Pittsburgh
I first quoted the price at $99.00 so that is what it will be, for either type. This is mostly an effort to keep our bikes running. Others are doing some incredible work so please support them as well. Thanks in advance. Al
 

Trialsman

Well-known member
Likes
600
Location
Pittsburgh
I think I got a PM to everyone who said they wanted one. Let me know if I somehow missed anyone. The response has already been very brisk, and for good reason. I will remove the two on my bikes so I can post up some pictures. This may help with anyone needing more information on the construction or mounting. My biggest fear during this process is that I would drop mine in the handling process. It fortunately never happened.
 

Trialsman

Well-known member
Likes
600
Location
Pittsburgh
Somehow I missed you - sorry Wildman ! Enjoy your bike and hopefully this will reduce a major concern for vulnerable and important part on our bikes.
 

Trialsman

Well-known member
Likes
600
Location
Pittsburgh
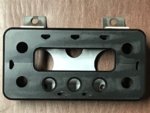
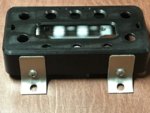
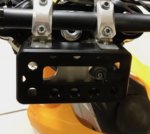
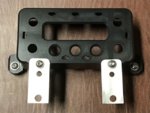
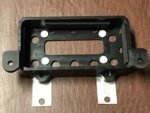
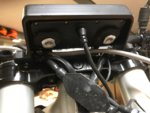
Here are some pictures of the finished AltaVault. The first is the MX/MXR style which sits at a tilt behind the steering stem.
It consists of : 1- milled guard from solid (6061) hard coat anodized
1- milled plate (6061) no finish
1- 2.5mm hex SS set screw
2- 3mm hex SS button head screws
4- strips neoprene foam
4- felt spots
2- 1" wide SS x .060" mounting brackets
The display unit is fitted into the guard between the foam pieces. The set screw bottoms out on the non-anodized base with the two button heads going through the mounting brackets and attaching through the guard and into the base on the forward side. IMG_5459.jpgIMG_5460.jpgIMG_5461.jpgIMG_5449.jpg Route the display cable to the rear of the steering stem. Just remove the rear handlebar clamping bolts and slide bolts through larger hole in the SS brackets. Tighten, check the front bolts for proper tension, and you are ready to ride.
 

Trialsman

Well-known member
Likes
600
Location
Pittsburgh
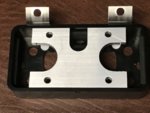
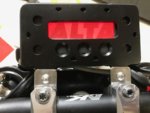
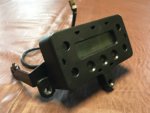
The next is the EX/EXR style and is slightly different due to it's mounting position behind the headlight. It uses the bracket which normally attaches the display to the ears on the top triple clamp.
This AltaVault consists of:
1- milled guard from solid (6061) hard coat anodized
2- 4mm hex SS button head screws
2- 3mm hex SS button head screws
4- strips neoprene foam
4- felt spots

The display unit is fitted into the guard between the foam pieces. The holes in the OEM bracket will align with the holes in the larger ears on the guard. Using the two M6 button heads (4mm hex) attach the guard and base to the triple clamp. Remove the front two handlebar clamping bolts and slide the bolts through the SS brackets once the pieces are slipped between the clamp pieces. Tighten, making sure you have proper tension on the rear bolts as well. Go hit the trails. One place for customization is there are two small holes in each SS bracket. That is to accommodate the center or the rear handlebar position on the triple clamp. If you end up using the rear hole you may just cut off the excess SS containing the front hole. IMG_5393.jpgIMG_5447.jpgIMG_5454.jpgIMG_5455.jpgIMG_5456.jpg
 

Trialsman

Well-known member
Likes
600
Location
Pittsburgh
If you go to the link in post #85 you can order. Sorry that I missed you.
I also just posted a bunch of pictures and information, but in the wrong thread ! It is under electrical repairs for a "Broken display...Solutions?". Oops.
 

evh1

Well-known member
Likes
190
Location
Montgomery, AL
Trialsman...many thanks for the early note to buy the module for my EXR. I got it ordered AND saw the ADV bike jack, so I got it too! Thanks for this piece; I damn near had to walk out a long way one day riding by myself on my Ducati Enduro Pro...damn pig weighs 567lbs and when it goes down, it's a bear to stand up. After an hour of cussing and using a stump as a fulcrum and a big limb as a lever..thx high school physics class..., I got the Beast up. No longer a prob with the Dirt Napper jack....perfect solution.
 

Trialsman

Well-known member
Likes
600
Location
Pittsburgh
Things are a little crazy. I got a request to send 4 AltaVaults to Indonesia but I cannot find it again! I apologize, but would you send me a PM with your postal code so I can check the shipping for you? Thanks.
 
Similar threads

Similar threads

Top Bottom