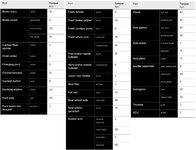
Torque specs


Upinsmoke57

Active member
Likes
34
I made this PDF to have all the typically needed specs in one place. The manual is not very good at listing them all in one place so here it is. Just print in landscape and trim to around 6" height and it will glue right inside the lid of the included toolbox.
 

AL_V

Well-known member
Likes
158
Location
Canton, Ohio
Nice, but where did you find the countershaft bolt torque?
I'm not saying you're wrong, but I couldn't find it so I emailed Stark and they told me 80 Nm.
 

Upinsmoke57

Active member
Likes
34
I'm glad you pointed this out. I actually could not find that spec anywhere and resorted to my Ktm 300 spec just to give myself a ballpark figure. Thanks for catching this and correcting it. There are also some contradictory specs like on the chain tension. It says to use the 3 finger rule but also says the range is 25-32mm. I don't know about you but my 3 fingers are way bigger than 1.25". Anyways, I am pretty sure that was the only one on there I had to take a guess at. I'll change it to 80Nm. There are obviously a bunch of other specs I left out from the manual as they aren't typical things you have to work on and can be hand torqued pretty safely.
 

ReVolter

Member
Likes
23
Location
london ontario
I'm glad you pointed this out. I actually could not find that spec anywhere and resorted to my Ktm 300 spec just to give myself a ballpark figure. Thanks for catching this and correcting it. There are also some contradictory specs like on the chain tension. It says to use the 3 finger rule but also says the range is 25-32mm. I don't know about you but my 3 fingers are way bigger than 1.25". Anyways, I am pretty sure that was the only one on there I had to take a guess at. I'll change it to 80Nm. There are obviously a bunch of other specs I left out from the manual as they aren't typical things you have to work on and can be hand torqued pretty safely.
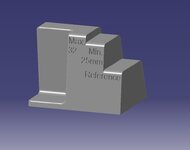
Here is a 3D model of the Varg chain slack gauge I made. Makes it easy to adjust the chain to specifications. Pull the chain tight by pushing down the bottom, and slide the gauge along the swing arm until the reference (0 point) touches. Release the chain and then tighten the chain until it goes over the second level but not over the third level.
 

Attachments

  • Varg Chain Slack Gauge.zip
    463.1 KB · Views: 13

AL_V

Well-known member
Likes
158
Location
Canton, Ohio
Here is a 3D model of the Varg chain slack gauge I made. Makes it easy to adjust the chain to specifications. Pull the chain tight by pushing down the bottom, and slide the gauge along the swing arm until the reference (0 point) touches. Release the chain and then tighten the chain until it goes over the second level but not over the third level.
Thank you for sharing the file, I converted it to a step file so I could open it in my 3d software.
Could you provide a photo of it on the bike, as I'm a little confused by your instructions.
Thanks!

Varg Chain Slack Gauge.jpg
 

Attachments

  • Varg Chain Slack Gauge step.zip
    5.6 MB · Views: 2

ReVolter

Member
Likes
23
Location
london ontario
The reference level represents 0 chain deflection, that tells the gauge is in the right place. The first platform above that is the minimum chain slack, and the top platform is the maximum chain slack.

Once you set the slack correctly the bike runs quieter with no chain slap.
 

AL_V

Well-known member
Likes
158
Location
Canton, Ohio
The reference level represents 0 chain deflection, that tells the gauge is in the right place. The first platform above that is the minimum chain slack, and the top platform is the maximum chain slack.

Once you set the slack correctly the bike runs quieter with no chain slap.
Got it, thanks.
 

Upinsmoke57

Active member
Likes
34
Isn't the measurement supposed to be right at the end of the plastic chain guide? I know they have the sprocket a lot closer to the swingarm pivot but that 32mm makes me super nervous. I guess from always adjusting to KTM's specs. It is also weird the Stark manual says to use the 3 finger method which I can only assume there aren't many people who's 3 fingers add up to 32mm. That's more like 2.5" compared to their 1.25". I'm confused on that one. Either way I would always air on the loose side. And if one was really paranoid they could disconnect the shock and check the tension that way.
 

DickyMP

New member
Likes
0
Location
UK
I made this PDF to have all the typically needed specs in one place. The manual is not very good at listing them all in one place so here it is. Just print in landscape and trim to around 6" height and it will glue right inside the lid of the included toolbox.
Has the file been removed? I was gonna make this myself to go in the toolbox...
 

Similar threads

Top Bottom