Stock varg suspension revalve?! Enduro & Trail riding


Aleksandar13

Active member
Likes
41
Location
Uk
Hi all,

Trying to find out from owners experiences if the suspension get softer and after how many hours of riding?!

I've got my stark recently and I really enjoy it a lot, on byways and fast sections it's ridiculously good but in technical terrain I feel that I'm getting hammered and it feels harsher than I'm used to.

I'm no pro rider, 104kg without gear and medium springs as per my dealers recommendation.

I'm tempted to go to a specialist shop and get it revalved. Planning some ebduro days next year, maybe starting in January.

Would love to hear some thoughts about people who have done it on the stark or other similar bikes.

Thanks Aleks
 

AL_V

Well-known member
Likes
143
Location
Canton, Ohio
Hi all,

Trying to find out from owners experiences if the suspension get softer and after how many hours of riding?!

I've got my stark recently and I really enjoy it a lot, on byways and fast sections it's ridiculously good but in technical terrain I feel that I'm getting hammered and it feels harsher than I'm used to.

I'm no pro rider, 104kg without gear and medium springs as per my dealers recommendation.

I'm tempted to go to a specialist shop and get it revalved. Planning some ebduro days next year, maybe starting in January.

Would love to hear some thoughts about people who have done it on the stark or other similar bikes.

Thanks Aleks
I have about 150 hours on mine, it loosens up a little bit early on, but it's still valved for MX.
I am planning on a revalve over the winter.
 

Aleksandar13

Active member
Likes
41
Location
Uk
I have about 150 hours on mine, it loosens up a little bit early on, but it's still valved for MX.
I am planning on a revalve over the winter.
Spoke to a shop today,they said to get sag numbers to him and get the sag at 105mm and then we can talk about how it feels
 

User2123

Member
Likes
17
I'm exhausted researching this myself as well. What I gather after searching the internet, looking through the racetech bible, talking to a few friends who know KYB sss very well and a few suspension shops is that everyone has a separate answer. But this is my approach as I am in the same boat. First thing is to be in the range of the spring so you know you're starting at the right height in the stroke. I weigh 175 without gear and 200-205 with gear and I was also told to go medium. The bike was unbearably stiff when new. Literally from just sitting in a hot garage for 10 days while I was on vacation I could tell the difference. I have 2 rides on the bike and it has softened an amazing amount. The first thing I did was to take the seat cover off and make a hundred holes in the foam. I was waiting for seat concepts to release theirs and as of now it is available online. Honestly that didnt make that much difference drilling the holes but it did help. My sag was at 38/104. Slightly below the 40-45 static but on the low end of the rider sag which is what I was told to do. I removed 20cc of fork fluid through the bleeder hole. I will test that tomorrow. I've heard this is only noticeable after the first 3-4" travel. I had originally reached out to Super Plush in SF and they wanted over $1250 for the forks and shocks. They also were really busy. I decided to just buy all the necessary tools and planning to tackle this myself. Really it's not a technically hard thing to do, the whole game is knowing how many of what shims to add/remove. One could spend a lifetime playing with this stuff. Here's what I have gathered, averaging out information from many sources. For what we ride, slow technical hard enduro, we should be fine starting with the removal of 50% of the compression face shims. I have no idea what the outcome will be and have never done this before. I can report back when I do. The main thing to check before yanking your shock apart is to see if you have someone local that will fill it back to 150 psi with nitrogen. I've heard you can use air from a high pressure bike pump but I want it done right. A friend said he went to the costco tire center and they were able to get it to 80psi and he filled the rest with air. Up to you. I have a connection that can do it properly but make sure you got that all planned in advance. Also, I have my comp clickers al the way out(+1 in just so it's not literally backed out to the last thread). I have my rebound in 6 clicks. That's measured from turned all the way out. Having your rebound clickers all the way out will make a pogo stick out of your bike. Not sure what other options there are as these are MX forks. The KYB is nice that it has a very useable range with the clickers. I felt like all my WP forks had a very small noticeable range in comparison. However I'd kill to have my KTM 300 XCW suspension back!

So to recap:

Tubliss-lower tire pressure.

seat foam. Guts and Seat concepts have soft foam inserts

remove 10-20cc fork oil.

comp clickers all the way out

rebound clickers in 5-6 from all the way backed out. Same for low/ten and high rebound on shock. Shock high reb has over 40 clicks! Maybe just more increments. I don't get this if someone can please explain.

make sure the spring is the right rate for you as a starting point. The Race tech calculator and site is a very valuable resource. I'd be more inclined to trust them over the Stark spreadsheet or specs for recommended spring rates.

get sag in range

remove 40-50% face shims on the comp stack fork and shock. maybe 1 mid face shim after crossover? I haven't seen what's inside there yet.

Last resort, put it back how it was and take it to a pro :)
 

Aleksandar13

Active member
Likes
41
Location
Uk
I'm exhausted researching this myself as well. What I gather after searching the internet, looking through the racetech bible, talking to a few friends who know KYB sss very well and a few suspension shops is that everyone has a separate answer. But this is my approach as I am in the same boat. First thing is to be in the range of the spring so you know you're starting at the right height in the stroke. I weigh 175 without gear and 200-205 with gear and I was also told to go medium. The bike was unbearably stiff when new. Literally from just sitting in a hot garage for 10 days while I was on vacation I could tell the difference. I have 2 rides on the bike and it has softened an amazing amount. The first thing I did was to take the seat cover off and make a hundred holes in the foam. I was waiting for seat concepts to release theirs and as of now it is available online. Honestly that didnt make that much difference drilling the holes but it did help. My sag was at 38/104. Slightly below the 40-45 static but on the low end of the rider sag which is what I was told to do. I removed 20cc of fork fluid through the bleeder hole. I will test that tomorrow. I've heard this is only noticeable after the first 3-4" travel. I had originally reached out to Super Plush in SF and they wanted over $1250 for the forks and shocks. They also were really busy. I decided to just buy all the necessary tools and planning to tackle this myself. Really it's not a technically hard thing to do, the whole game is knowing how many of what shims to add/remove. One could spend a lifetime playing with this stuff. Here's what I have gathered, averaging out information from many sources. For what we ride, slow technical hard enduro, we should be fine starting with the removal of 50% of the compression face shims. I have no idea what the outcome will be and have never done this before. I can report back when I do. The main thing to check before yanking your shock apart is to see if you have someone local that will fill it back to 150 psi with nitrogen. I've heard you can use air from a high pressure bike pump but I want it done right. A friend said he went to the costco tire center and they were able to get it to 80psi and he filled the rest with air. Up to you. I have a connection that can do it properly but make sure you got that all planned in advance. Also, I have my comp clickers al the way out(+1 in just so it's not literally backed out to the last thread). I have my rebound in 6 clicks. That's measured from turned all the way out. Having your rebound clickers all the way out will make a pogo stick out of your bike. Not sure what other options there are as these are MX forks. The KYB is nice that it has a very useable range with the clickers. I felt like all my WP forks had a very small noticeable range in comparison. However I'd kill to have my KTM 300 XCW suspension back!

So to recap:

Tubliss-lower tire pressure.

seat foam. Guts and Seat concepts have soft foam inserts

remove 10-20cc fork oil.

comp clickers all the way out

rebound clickers in 5-6 from all the way backed out. Same for low/ten and high rebound on shock. Shock high reb has over 40 clicks! Maybe just more increments. I don't get this if someone can please explain.

make sure the spring is the right rate for you as a starting point. The Race tech calculator and site is a very valuable resource. I'd be more inclined to trust them over the Stark spreadsheet or specs for recommended spring rates.

get sag in range

remove 40-50% face shims on the comp stack fork and shock. maybe 1 mid face shim after crossover? I haven't seen what's inside there yet.

Last resort, put it back how it was and take it to a pro :)
Good luck with everything, once I have my sag setup which I will tackle tomorrow I will go out on a ride and report back here and to the shop that I have been in touch with.
From his experience sag should be 105mm and then see how you like it etc.

Ball park figure for me to drive in and out with no springs and he re-valving the units it would be around £300 and if springs required than up to £500. I have learned in the past not to mess around to much with suspension as it's a bit of a black art, so I will take it to this shop who is renowned for enduro prep in the UK.

Aleks
 

Aleksandar13

Active member
Likes
41
Location
Uk
Adjusted the sag today for people who might be interested, my weight without gear is 105kg..springs are medium and the sag vad 114mm with static 35mm. Now 105mm race sag and 30mm static.

I have decided after today that it definitely needs a revalve for the type of riding that I do.

Can't wait to get it sorted.
 

User2123

Member
Likes
17
You are definitely under sprung. You need to get that right first. They should have told you to get the heavy springs. That's just my understanding from talking to a few people. I'm 200 with my gear and the best I could do was 38/104.

So I can report back that taking fork oil out doesn't make any noticeable difference at all. Tried 10ml and 20ml removal. I put zip ties around the forks and shock to see how much travel I was using. I was really surprised to see the shock was completely bottoming out to the bumper. The zip tie was pushed down into the rubber bushing. The forks however have about 3-4" left of travel.

It's really hard to know what the right thing to do is. We rode the bike around a small track with small jumps and that most likely is what got the travel to go lower. But the average riding we do is slow technical stuff so I'd like for it to be more compliant over more range yet still have high speed compression available. This really is why taking it to a pro is the right thing to do. But I'm stubborn and really curious to play around with the shims a little before throwing in the towel. The plan is to leave the shock as is and remove 2-3 face shims on the forks comp stack. Will report back.

Also the seat is way too damn hard. Even after poking holes and slicing up the foam it's nothing like my KTM was. So I'm going to order the softer seat insert as I know that makes a huge difference. The KTM xcw was a couch and the difference going to the soft seat concepts was very noticeable. It's money well spent.
 

Aleksandar13

Active member
Likes
41
Location
Uk
You are definitely under sprung. You need to get that right first. They should have told you to get the heavy springs. That's just my understanding from talking to a few people. I'm 200 with my gear and the best I could do was 38/104.

So I can report back that taking fork oil out doesn't make any noticeable difference at all. Tried 10ml and 20ml removal. I put zip ties around the forks and shock to see how much travel I was using. I was really surprised to see the shock was completely bottoming out to the bumper. The zip tie was pushed down into the rubber bushing. The forks however have about 3-4" left of travel.

It's really hard to know what the right thing to do is. We rode the bike around a small track with small jumps and that most likely is what got the travel to go lower. But the average riding we do is slow technical stuff so I'd like for it to be more compliant over more range yet still have high speed compression available. This really is why taking it to a pro is the right thing to do. But I'm stubborn and really curious to play around with the shims a little before throwing in the towel. The plan is to leave the shock as is and remove 2-3 face shims on the forks comp stack. Will report back.

Also the seat is way too damn hard. Even after poking holes and slicing up the foam it's nothing like my KTM was. So I'm going to order the softer seat insert as I know that makes a huge difference. The KTM xcw was a couch and the difference going to the soft seat concepts was very noticeable. It's money well spent.
I agree with you, probably stativ should be around 50mm for a nicer ride... Also in comparison to wp on my ktm 1090 advr, where I'm using 95 percent of the fork travel on the varg I have 30 to 40 percent left to use... Hence it needs to be softer for the type of riding I do. Will report back when I get some news from the suspension master 😀.
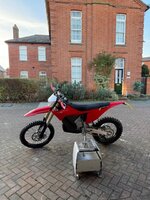
Here's a photo from today

IMG_9298.jpeg
 

Theo

Well-known member
Likes
120
Location
Italy
Adjusted the sag today for people who might be interested, my weight without gear is 105kg..springs are medium and the sag vad 114mm with static 35mm. Now 105mm race sag and 30mm static.
Have you used the SAG marking on the rear spoiler as per the manual? In the past I've tried measuring the SAG on a dirtbike without having a mark and found out that the value changed a lot depending on the end point that I chose on the rear fender. Also a little trigonometry can lead you to the same conclusion, that's why I like the markings on our Vargs and I think that for every bike the two ends of the measurement should be specified.
 

Aleksandar13

Active member
Likes
41
Location
Uk
Have you used the SAG marking on the rear spoiler as per the manual? In the past I've tried measuring the SAG on a dirtbike without having a mark and found out that the value changed a lot depending on the end point that I chose on the rear fender. Also a little trigonometry can lead you to the same conclusion, that's why I like the markings on our Vargs and I think that for every bike the two ends of the measurement should be specified.
Yes, that's a nice touch from Stark. I used that and got the results above.
 

User2123

Member
Likes
17
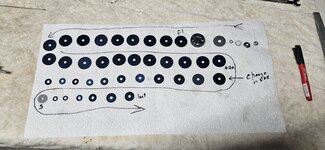
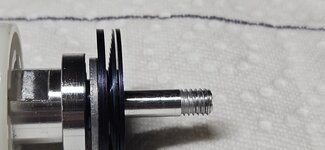
I went at it last night. I was able to remove the base valves relatively easily while in the bike. I had to take off the bars though. I wouldn't recommend doing this if you're not a patient, mechanically skilled and methodical person. There are a lot of areas to mess things up at. I don't really feel the need to go into each step but I'll show what it looks like. I was really surprised to see there are 20 face shims!1000005159.jpg

20241108_165714.jpg

20241108_161140.jpg

20241108_201718.jpg
 

Aleksandar13

Active member
Likes
41
Location
Uk
I went at it last night. I was able to remove the base valves relatively easily while in the bike. I had to take off the bars though. I wouldn't recommend doing this if you're not a patient, mechanically skilled and methodical person. There are a lot of areas to mess things up at. I don't really feel the need to go into each step but I'll show what it looks like. I was really surprised to see there are 20 face shims!View attachment 12208

View attachment 12209

View attachment 12210

View attachment 12211
Good job mate. I wouldn't come close myself. Let me know what you plan on doing. Also some useful information on YouTube about shims etc, I presume you are watching before changing stuff.
 

Theo

Well-known member
Likes
120
Location
Italy
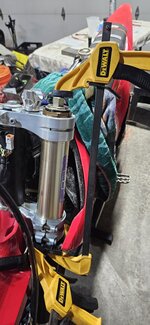
I went at it last night. I was able to remove the base valves relatively easily while in the bike. I had to take off the bars though. I wouldn't recommend doing this if you're not a patient, mechanically skilled and methodical person. There are a lot of areas to mess things up at. I don't really feel the need to go into each step but I'll show what it looks like. I was really surprised to see there are 20 face shims!
So you removed the compression valving without disassembling the fork any further; I've never seen anything like this before, but if it worked I think it's ok. It seems that you also needed that yellow DeWalt trigger clamp when putting it back: I guess you couldn't bleed the inner chamber and so it was too hard to do it just by hand...
 

User2123

Member
Likes
17
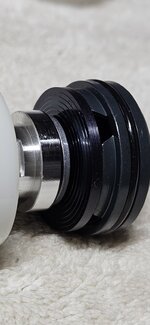
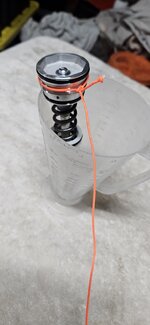
I have a few friends that are self-proclaimed KYB gurus and I took a leap of faith having their expertise at my disposal. I figured if I couldn't get the base valve back in I could always take it all apart and do things the "correct" way. The base valve core unscrews easily with the top triple clamp bolts loosened. With some gentle finessing you can tie a thin line under the threads and gently pull upward. And yes, the clamps were a simple way to gently control the force needed to get that damn thing back in there without cross threading the cap. I was told a little air will bleed out but you wanna be as close to the original level of oil if possible. The goal is to keep as much of the oil as possible so I went straight to the container and let it drip for a long time. Then wrapped it up nice and tight with rubber gloves and electrical tape to file the nut. I was not 100% sure if the peening on the center of the shaft was needed for holding the clicker tube so I was very careful to just take off the perimeter. This is much smaller than I had imagined from all the online material I've seen. This is surgical work! I placed a toothpick in the center to keep filings out. I used a toothbrush to wipe away any shavings every few file swipes. Takes time. But after very carefully laying out the shims and labelling them I had a conference call with my 2 KYB gurus and we decided to go with 8 face shims out of the 20, use the smallest washer on the other end as a x-over, then 2 face shims followed by the stock taper. I used the rest of the face shims to build the height back up which may not be necessary. I think there were enough threads left over to squeeze the shims down but we will see. There is so much to know about this dark art. At a certain point when the base shim stack gets too "light" it will place unwanted load on the midvalving. I got my suspension to use almost all of the shock travel and the forks down to about 3-4" left of travel. I ride slow technical stuff and wanted all the travel. We figured if we air on the softer side then we can get the compression clickers more in the middle of their click range. I have no idea what comes next. This is the deepest possible rabbit hole one can get into on a motorcycle. It's absurd and consumes ones life. It makes spending $1200 to have a pro do their thing all the more worth it. But I enjoy nerding out on how things work. I will report back as to how my new shim stack does. Unfortunately I can't test this out on my street and really need some rocks to bash into. I'll get back ASAP.

Also, if anyone in the know can say if this is a good or bad idea to take the remainder of face shims and placing them on the other side to make up the overall height of the stack, please let me know. I don't fully understand the flow of oil around that back part. You can see in my pic the stack of larger shims on the left side were part of the right stack originally.

20241108_183038.jpg
 

Aleksandar13

Active member
Likes
41
Location
Uk
I have a few friends that are self-proclaimed KYB gurus and I took a leap of faith having their expertise at my disposal. I figured if I couldn't get the base valve back in I could always take it all apart and do things the "correct" way. The base valve core unscrews easily with the top triple clamp bolts loosened. With some gentle finessing you can tie a thin line under the threads and gently pull upward. And yes, the clamps were a simple way to gently control the force needed to get that damn thing back in there without cross threading the cap. I was told a little air will bleed out but you wanna be as close to the original level of oil if possible. The goal is to keep as much of the oil as possible so I went straight to the container and let it drip for a long time. Then wrapped it up nice and tight with rubber gloves and electrical tape to file the nut. I was not 100% sure if the peening on the center of the shaft was needed for holding the clicker tube so I was very careful to just take off the perimeter. This is much smaller than I had imagined from all the online material I've seen. This is surgical work! I placed a toothpick in the center to keep filings out. I used a toothbrush to wipe away any shavings every few file swipes. Takes time. But after very carefully laying out the shims and labelling them I had a conference call with my 2 KYB gurus and we decided to go with 8 face shims out of the 20, use the smallest washer on the other end as a x-over, then 2 face shims followed by the stock taper. I used the rest of the face shims to build the height back up which may not be necessary. I think there were enough threads left over to squeeze the shims down but we will see. There is so much to know about this dark art. At a certain point when the base shim stack gets too "light" it will place unwanted load on the midvalving. I got my suspension to use almost all of the shock travel and the forks down to about 3-4" left of travel. I ride slow technical stuff and wanted all the travel. We figured if we air on the softer side then we can get the compression clickers more in the middle of their click range. I have no idea what comes next. This is the deepest possible rabbit hole one can get into on a motorcycle. It's absurd and consumes ones life. It makes spending $1200 to have a pro do their thing all the more worth it. But I enjoy nerding out on how things work. I will report back as to how my new shim stack does. Unfortunately I can't test this out on my street and really need some rocks to bash into. I'll get back ASAP.

Also, if anyone in the know can say if this is a good or bad idea to take the remainder of face shims and placing them on the other side to make up the overall height of the stack, please let me know. I don't fully understand the flow of oil around that back part. You can see in my pic the stack of larger shims on the left side were part of the right stack originally.

View attachment 12215
It's like anything in life, try and see... I suppose the advantage you have is that once your try and test it and if your not 100 percent happy you can then adjust it to suit. The only downside is the time and effort it takes you to get to that point. I have to much on my hand to even give it a go 😁. Good luck with it man looks like you are on to a good start.
 

Theo

Well-known member
Likes
120
Location
Italy
I have read in other forums that some people use Shim ReStackör to speed up the process: you can consider it.
 

User2123

Member
Likes
17
Re stacker is good to get a ballpark of what's going to do what. Nothing will really determine the way it feels like just going at it and trying. The other thing is I was not prepared with a surplus of shims to adjust as needed. Initially I was only planning to remove 50% of the face shims. I was talked into making a crossover(2 stage) using a small shim. But there are some points of concern with what I did. I'll test it shortly. If all goes well and do actually notice a worthwhile result I'm happy to share what I ended up doing. Of course all of our weights, riding styles and environments are different. But I think we can get close to what we want for those of us using the bike for slower hard enduro. Fortunately it seems to be less of a science than tuning for a top MX rider.
 

Similar threads

Top Bottom