Yet another CRF 250 Build but its my first so... ;)


fmxxx666

Active member
Likes
34
Location
Hamburg Germany
Hi All,

totally new to all of this.
I left the MX hobby about 10 years ago.
Recently visited the local track to smell some 2 Stroke smoke but then a dude on a Husqvarna E MX bike came across and the performance of the bike blew me a way.
I havent really looked into bikes the past years so I have not noticed any new trends in that regards the last thing I knew was KTM came out with the Freeride E but I guess that has been a few years now as well.

So I started googling around and watching some YT vids and finally thought oh great an ALTA sounds about right for me... found one close by for a reasonable price but then a day or so before I wanted to go there and check it out I read about ALTA is out of Business and you don´t get parts anymore etc. so I made a step away from the ALTA of cause.
Stark Varg is just a little outside my Budget right now and it still looks a little too futuristic to me.
I like the looks of a "classic" 2002-2021 MX Bike.

after deep diving into the DIY E Dirtbike Facebook groups I think I can do it myself :)
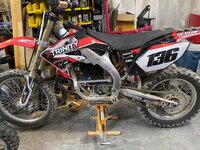
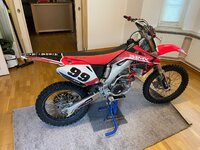
A friend had a perfectly working CRF 250 R 2009 Honda standing around and he was looking to sell it so I jumped on it.
Unbenannt.jpg

Plans for the Build:

Motor:
QS138 70h V3 (the new improved 2024 version)

Controller:
EBMX X-9000 V2

Battery:
no idea yet probaply custom made Amorge one when I cannot find anything from the shelf that would fit in but in general 72V with near 600a peak and near 400a constant and as much AH as I can fit ;)

Throttle:
unsure yet whats gonna work... bought a surron but the twist way is super short... bought a E-cable box but ppl say everywhere they wont trust these... maybe also getting a "Hirschmann dual Hall throttle" we will see what works out.

Rear Brake:
keep it original for the beginning but definalty wanna try left hand rear brake.


Progress so far:
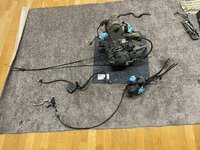
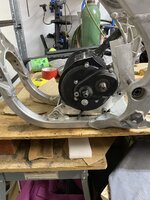
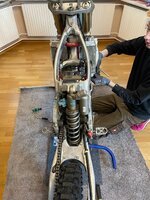
engine out :)
Unbenannt2.jpg Unbenannt4.jpg

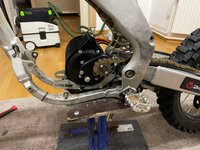
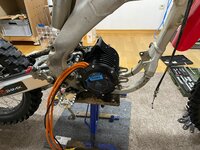
QS palced with Lithium Kings Universal Mount:
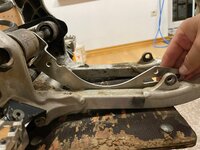
Unbenannt5.jpg Unbenannt7.jpg
Unbenannt6.jpg

now waiting for delivery of some parts...
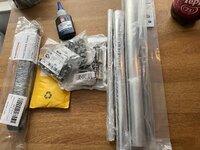
Bolts, Nuts, Shrink Tubes, Spacers, EBMX Controller to continue but I will keep updating this thread as the build progresses any comments, hints, feedback welcome

Greetings from northern Germany
 

DonCox

Well-known member
Likes
410
Location
Lake Havasu City, AZ
These mounts appear awfully flimsy! Do they work well?

@DonCox
Yes they are made of steel, and work well. Two things I see are the third bolt for the motor and spacers in the front and rear mounts. You said you are waiting for the long bolts for the front motor mount with spacers, ( I use the stock bottom motor mount bolt from the gas motor ), and the long 8mm bolt for the rear motor bolt. You will need spacers in the swing arm bolt also between the brackets.
 

DonCox

Well-known member
Likes
410
Location
Lake Havasu City, AZ
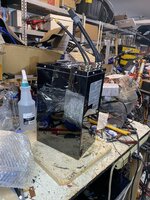
I have built a lot of these type bikes, and have just finished a 2005 450CRF. I used Lithium-king for mounts and sprockets, QS138 70H V3 motor and the Votol EM260S ( the EBMX X9000 is a very good controller ) and a Amorge battery. ( 20S12P Molicell P42A cells, ANT smart BMS in a metal box that tightly fits into the CRF frame) I had to notch the frame in the 4 corners of the battery. The Battery was $1801 to my door from China. A friend had a same size box battery with 20S13P Samsung cells 50S built by Amorge also, he likes to Trail ride and wanted more distance and lower power. I can send you lots of picture of different parts of the build, if you want. Here is a picture of the bike and the battery

IMG_6594.JPG

IMG_6818a.JPG
 

fmxxx666

Active member
Likes
34
Location
Hamburg Germany
Thanks for the input @DonCox (y)
I choose the EBMX controller mainly for its easy to use userinterface with bluetooth and the app, to not have to carry a laptop to the track to quickly change something although I think once you find the right settings you no longer have to touch it anyways.
I am still a bit lost when it comes to this Battery details like "20S12P" is that 72V 50ah? or less? whats the nominal and max amps its able to discharge?
My 250 CRF frame might be a little different from your 450 Frame so I anyway have to tell Amorge whats the max size I can put in and then they should calculate whats the Max AH they can put in at 72v with a Metal Casing and QS10 Connectors.
I am not afraid of cutting / grinding a little on the frame to make more space for the battery (as long as it doesn´t affect the sturdyness of the frame) as I just sold the combustion Engine yesterday there is no plan to ever put a gas engine in it again.

today I recieved the missing parts:
Unbenannt11.jpg
the controller should be with me tomorrow so I can continue on the weekend.
Fix the motor in place and find the right place for the controller.
then I will briefly check how much space I can create for the Battery.
 

fmxxx666

Active member
Likes
34
Location
Hamburg Germany
Mounting for the Battery I am playing with the idea of doing it out of 8-10mm Carbon sheets cut to size with large bolts going across to the other side with spacers in between.
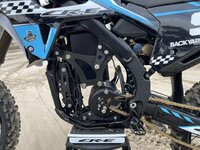
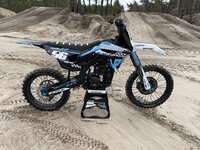
Saw it on a bike that a company here in Germany (https://www.zweiradsport-brunner.de/) build for a customer: (its a CRF450 2021+ model)
426270178_6876778555767702_5768724651617607606_n.jpg426273927_6876777022434522_6035181618263264149_n.jpg2024_09_11_13_26_29_108_NEW_BIKE_Vlog_2_YouTube_Mozilla_Firefox.png2024_10_09_11_23_20_226_NEW_BIKE_Vlog_2_YouTube_Mozilla_Firefox.jpg
they used a 55ah 72v Battery (I sadly have no more detials on the battery than that)

if anyone wants to see more of that bike beeing build here is a Vlog of the build thats shows at least some details (but its of cause all in german) :


they placed the EBMX controller in the very front of the Frame which I absolutely don´t want as I have seen so many big Rocks knocking on the front fo my eninge in the past.
2024_09_11_13_20_37_108_NEW_BIKE_Vlog_2_YouTube_Mozilla_Firefox.png2024_09_11_13_23_28_108_NEW_BIKE_Vlog_2_YouTube_Mozilla_Firefox.png2024_09_11_13_22_28_108_NEW_BIKE_Vlog_2_YouTube_Mozilla_Firefox.png
my plan is to mount it inside the Airbox as I have seen most ppl do it that way.
 

Theo

Well-known member
Likes
120
Location
Italy
Very cool and interesting project.

If I were you, in order to decide in which position to install the battery, I would install it provisionally in different positions and then I would check the weight distribution of the bike in those positions, choosing if possible the best one.

I like the idea of using carbon fiber sheets, they also look very cool. AFAIK, before machining or cutting them, you should consider the orientation of their fibers. 8-10 mm sounds like something made up of a lot of layers; if their fibers are all oriented in the same direction, then the stiffness should vary a lot depending on the directions of the force applied to them, or there are also sheets with layers having fibers oriented in different directions in order to have similar stiffness with forces applied in different directions.

Considering that both Altas and Starks can have thermal limits, have you thought about something to avoid that on your bike?
 

fmxxx666

Active member
Likes
34
Location
Hamburg Germany
@Theo good points

I cannot really check the weight distribution upfront as I am not aware of how much the battery will wight in the end and I have to decide for its place before I can find out about the weight... but in general they are something beween 22-35kg I can maybe place something heavy inside a wooden box of the battery size and check.
But relatively middle of the frame where the OEM Engine was sitting should be fine.

have to check on the carbon sheets haven´t had any in my hands yet.
but definatly will look into the details there.
I may build everything out of 8mm wood first to get it sorted and once I have the right design I copy paste it to the carbon.
(have access to a CNC router and laser)

regarding thermal limits I havent spent a single thought yet since so many ppl build their DIY full size MX bikes in that way.
I mean QS138 motor, controller in the airbox and armorge battery middle of the frame if thats a problem I would have read about it before I guess.
But thats the kink of DIY, I guess we will see xD
 

DonCox

Well-known member
Likes
410
Location
Lake Havasu City, AZ
As far as thermal limits, the QS138 70H V3 is quite good. We ( probably 20+ DIY Bikes with pretty much the same QS138 70H V3, EM260S, 72V 50AH with an ANT smart BMS ) have not overheated the motor, We have overheated the controller without water cooling, and we have overheated the battery. The best counter for the battery is to get the BMS out of the battery box, go to Open Discharge (no BMS control of discharge), and /or make the battery so you can quick change it, and cool it during charge. The battery warms up while being used. If the BMS is inside the Battery box, it induces heat into the battery, your first moto or practice is fine. Come in to charge the warm battery, add more heat. Run second moto or practice, add more heat. Come in to charge a hotter battery and it will allow charge or not because it is already hot, or it will stop in the middle of a charge. It is slow to get the heat out of the battery box.
One friend has made it easy to change the battery, in a 2003 CRF450 . He has the whole build here on this forum Starting my bike build.
 
Likes
15
Location
Waupaca, Wisconsin
I'm considering converting a KX85 for my short wife. Is there any reason the Stark throttle won't work on projects like these?


DonCox

Well-known member
Likes
410
Location
Lake Havasu City, AZ
I believe the throttle used on the Stark is the same one used on the ALTA, it is the Hirschman Throttle. You could use it, but is has a large diameter and it makes it hard to actuate the front brake on the smaller bikes, and a lot of front brake master cylinders. There are ways around it and it does the job, but there are others that are used in the Surrons.
 

fmxxx666

Active member
Likes
34
Location
Hamburg Germany
a ton of parts are in now ready for friday to be installed.
Plan is to:
finally fix the motor in place
fix the controller in the Airbox
install the new Restyle Plastik Kit to see which areas of the Fule Tank I can cut away so it not gets visible.

then take measurements for the max available battery space
I hope we get that far as I am super enthusiatic to get to know how much AH at 72v Amorge can put in that space with a metal housing.
Hope I can get minimum something around this specs inside: AMORGE 20S13P 72V 52AH 320AMP Battery
the more the better of cause but at unter 50AH I would definatly need a second battery I guess for a full day of fun at the track with charging one while riding the other.

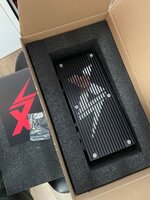
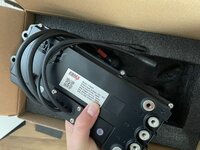
the EBMX Controller is such a sexy beast:

Unbenannt.jpgUnbenannt1.jpg

it comes with a ton of wires and accessories.
the "regen thumb throttle" could get interresting since you can configure it as an E-Clutch.


for anyone interested I am keeping track of the Build costs:
(all prices are euros and keep in mind most stuff I had to Import from China and USA so of cause you can get it cheaper somewhere but I had to pay world wide shipping, tax and toll on top to get it here and European Tax & Toll is a total different story then for you lucky ppl in the US ;) we really have to pay a sh*t ton on top like if the item you import is higher (with shipping costs) than 150$ we have to pay 20% tax on top 8$ Toll handling 🤬 so a freaking Cable harness for 65$ in the US cost me 220$ with 70$ shipping and tax and toll until I have it in my hands)

E-MX Bike Build
Parts (include Shipping Costs plus Tax and Toll to Germany)Money outMoney in
Honda CRF 250 R 2009
1.800,00 €​
Sold the CRF 250 Engine
700 €​
QS138 70H v3 E-Motor
533,44 €​
EBMX X-9000 V2 Controller
1.458,90 €​
TX-Race Plastics Kit (restyle to CRF450 2021+ plastics)
472,00 €​
Lithoum King Motor Mounts and 2x Sprockets 13T & 15T
214,00 €​
EBMX X-900 QS138 Harness
211,86 €​
Surron Throttle
11,89 €​
E-Cable Box
33,00 €​
Cable Trottle
9,29 €​
Screws Bolt Pipes Nuts etc:
3,55 €​
Screws Bolt Pipes Nuts etc:
13,99 €​
Screws Bolt Pipes Nuts etc:
19,49 €​
Screws Bolt Pipes Nuts etc:
59,67 €​
Screws Bolt Pipes Nuts etc:
45,46 €​
Screws Bolt Pipes Nuts etc:
8,39 €​
Screws Bolt Pipes Nuts etc:
8,49 €​
Screws Bolt Pipes Nuts etc:
9,49 €​
Polisport Plastik Kit White ( TX-Race only offeres Red, but the bike should be black and white only in the end)
99,00 €​
Magura Master Cylinder (left hand rear break) Used
90,00 €​
KTM Rekluse Hand rear brake Kit Brakeline
98,00 €​
a ton of Black Aluminium "Bling Bling" parts fot he bike
200,00 €​
Total Build Cost:
Costs:Earnings:
4.699,91 €​
5.399,91 €​
700 €​
Without Bike Parts only:
3.599,91 €​
Without Style, just the needed E-Parts:
2.875,43 €​
Budget left for Batteries:
4.100 €​
 

bananu7

Member
Likes
9
Location
Gdynia, Poland
Thanks for posting the build sheet. I'm actually building a CRF250 right now as well. My costs so far are 2900 eur for the bike without the ICE, but with motor, controller, and I took over the battery order for it. Technically should be ready to go, practically I'm invested about 400 eur extra at this point fixing all the tiny "screws bolts pipes nuts etc.". Still waiting for the battery.

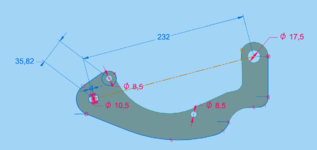
As far as the engine mounts go, I got them with the bike too, but made out of 3mm aluminium. I can bend that in my hands, the engine would've twisted that in a pretzel. I've designed a new bracket that should fit the CRF mounts exactly and position the sprocket as close as the swingarm clearance allows:
1729104442964.png

Happy to share the design files/DXF if needed; cutting that on laser or waterjet in 6mm alu should be just a couple bucks.

Are you planning on securing the swingarm bolt portion somehow? I really don't like how the end piece can freely move side to side. Plan is to make 22/17 spacers (matching original bearing spacers) and fit the mounts in between, clamping everything tight.

Good luck with the build!
 

Theo

Well-known member
Likes
120
Location
Italy
As far as the engine mounts go, I got them with the bike too, but made out of 3mm aluminium. I can bend that in my hands, the engine would've twisted that in a pretzel
[...]
Happy to share the design files/DXF if needed; cutting that on laser or waterjet in 6mm alu should be just a couple bucks.
I've just noticed that the swingarm axle doesn't pass through the case of that QS138 70h V3 motor, unlike what happens with ICE engines or with the power unit of the Varg, for example.
Wouldn't it be better to build the mounts with steel? Or would it be too expensive to cut it or machine it?
 

fmxxx666

Active member
Likes
34
Location
Hamburg Germany
Hi @bananu7
nice which model year is your CRF?
What battery you end up ordering?

I ordered so many pipes to make spacers xD
the Motor Mount Swingarm side is locked in place into every direction
will say its not able to move up down or right left
I have one big tube across with inner diameter to the screw that goes across the swingarm and outer diameter so it goes through the motor mount with a little need of force to lock the up and down movabilities ;)
and then spacers bigger than that outer diameter of the motor mount holes to lock it from moving right and left.
for the other end of the motor mount (front of the frame) I took a big screw that goes across also with spacers in between whereever possible.
Lets see how it works out when the motor releases its anger on the parts :p
 

bananu7

Member
Likes
9
Location
Gdynia, Poland
I've just noticed that the swingarm axle doesn't pass through the case of that QS138 70h V3 motor, unlike what happens with ICE engines or with the power unit of the Varg, for example.
Wouldn't it be better to build the mounts with steel? Or would it be too expensive to cut it or machine it?
The cost would end up being more or less the same (machining included - either can be cut on plasma, water or CNC in this form easily), but for the same durability, you'd need to go with at least 3mm steel like in the Lithium Kings mount which would be heavier than 6mm aluminium. Plus if not stainless, it'd require rust protection.
nice which model year is your CRF?
What battery you end up ordering?

At first I thought it's 2008, but now I think it's 2005 :D. It's been completed from parts, not all of them "period correct". Thankfully with the ICE gone, the rest is rather simple to figure out and the differences between 2004 and 2009 weren't that big.

I didn't order the battery, the original owner did. It's a 20s20p on Sanyo RX cells, giving about 40Ah or just under 3kWh. That's quite a small capacity in my opinion, but it should also keep the weight low. I've talked to the builder, it's mostly done but he's waiting for a new ANT BMS to put in. It's actually soldered rather than welded, on thick copper for continuous currents of 350A and peak however much it manages thermally. I'll get it without any case, and will likely be building one from glass fiber.

I ordered so many pipes to make spacers xD
the Motor Mount Swingarm side is locked in place into every direction
will say its not able to move up down or right left
I have one big tube across with inner diameter to the screw that goes across the swingarm and outer diameter so it goes through the motor mount with a little need of force to lock the up and down movabilities ;)
and then spacers bigger than that outer diameter of the motor mount holes to lock it from moving right and left.
for the other end of the motor mount (front of the frame) I took a big screw that goes across also with spacers in between whereever possible.
Lets see how it works out when the motor releases its anger on the parts :p
Well, I've just ordered a lathe, so I guess the cost of my build is quickly approaching yours, lol. I think I got your description, but for what it's worth, here's how I'm planning to attach mine:
1729109317856.png

The green and red will be 22/17mm spacers. The light gray are the original bushings. I think this should put me right on the proper chainline; if not, I'll replace the right side bushing with a shorter one (I have a spare swingarm so can borrow the 49mm one from the left side of it) and make spacers to fit.
 

DonCox

Well-known member
Likes
410
Location
Lake Havasu City, AZ
I have just finished a 2005 CRF450 and I used 1/4" (6mm) 6061 aluminum. Lithium-King .com drew them up and had them waterjetted for me. But There is a offset needed for certain frames. Here is a picture (PDF) of the mounts superimposed on a Honda frame. Use all the mounts on the motor. Mighte does not and a friend with a YZ250F and Mighte mounts has broken and damaged 2 motors because of poor mounting. Here is the replacement for his Mighte mounts. These were made by Lithium-King.com for a friends YZ250F. The new mounts I have made now included the back mount for the Battery tray. Lithium king has all the dxf files, you could probably just purchase the file from him, he just sends them to SendCutSend to do the water jetting , or have him do them for you. Here is a set I got from him for a 2018-2022 KTM . You can see 3 sets of bolts on the motor use them all

IMG_6981.JPG

IMG_7224[1].JPG
 

Attachments

  • Motor-Mount-Plate-QS138-V3-2007-CRF450 (1).pdf
    3.3 MB · Views: 8

bananu7

Member
Likes
9
Location
Gdynia, Poland
Thanks a bunch, Don! I was planning to only use two mounts, but if they're not enough, I'll definitely move to three. Thanks for the files as well. I've noticed the one you have has a 240mm swingarm-to-engine mount distance, while i measured at 232. I'll print them and put on a piece of cardboard and verify which one fits mine.
 

Dave Daum

Member
Likes
15
Location
San Diego
Mounting for the Battery I am playing with the idea of doing it out of 8-10mm Carbon sheets cut to size with large bolts going across to the other side with spacers in between.
Saw it on a bike that a company here in Germany (https://www.zweiradsport-brunner.de/) build for a customer: (its a CRF450 2021+ model)
View attachment 12014View attachment 12015View attachment 12016View attachment 12020
they used a 55ah 72v Battery (I sadly have no more detials on the battery than that)

if anyone wants to see more of that bike beeing build here is a Vlog of the build thats shows at least some details (but its of cause all in german) :


they placed the EBMX controller in the very front of the Frame which I absolutely don´t want as I have seen so many big Rocks knocking on the front fo my eninge in the pas
my plan is to mount it inside the Airbox as I have seen most ppl do it that way.
The battery in the photo may have come from Eon:
 
Top Bottom