Little brass thread inserts in plastic -- How to fix


Jared

Well-known member
Likes
159
Location
Arlington, WA
I have resorted to about 30 inch pounds and using permatex gasket sealer on the bolt threads to prevent them from vibrating loose or corroding in place from moisture getting trapped on the threads...so far so good.
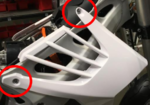
The front inserts on the “clamshells” bottom onto the aluminum frame tabs, so they can be tighter.
 

Jared

Well-known member
Likes
159
Location
Arlington, WA
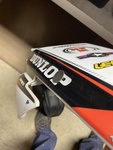
Picture with impact driver is removing “spun” insert by drilling through plastic ant into brass insert to put in upside down drill bit to lock into place and allow bolt to be removed.
 

Rashid510

Well-known member
Forum's Sponsor
Likes
1,171
Location
South San Francisco, CA
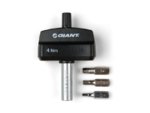
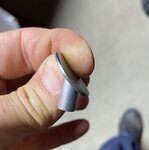
Uhm, so the faring bolt torque is 4Nm = 35 inch lbs (Google math). There are slightly longer and shorter bolts as well. Also the silver bushing that goes into the fairing (see below) stops that insert from spinning (too late). Need a deltawing?

1571703899242.png

(Also for the rear subframe the torque limit for those screws are 2Nm = 17.7 in/lbs)
 

OneLapper

"You don't *really* need the water pump...."
Forum's Sponsor
Likes
990
Location
Connecticut
The dealer had to replace the ACM immediately after I purchased my bike. They spun every single insert they could possibly spin. If it didn't come loose, they spun it till it melted the plastic and fell out.

Thankfully, Alta replaced all the damaged pieces. I installed them without loctite. Haven't had a problem since.
 

Jared

Well-known member
Likes
159
Location
Arlington, WA
The dealer had to replace the ACM immediately after I purchased my bike. They spun every single insert they could possibly spin. If it didn't come loose, they spun it till it melted the plastic and fell out.

Thankfully, Alta replaced all the damaged pieces. I installed them without loctite. Haven't had a problem since.
I bought this EX used, and I think most of the carnage is from the previous owner working on it. It seems like there is evidence everywhere of work done on it that someone who shouldn’t work on bikes did. Had a lot of fun trying to figure out why the license plate illumination and tail-light weren’t working. They would just flick on momentarily and then stay off until the key was cycled. The previous owner had connected the purple wire (tail) to where the yellow wire (stop) goes and the yellow wire to where the purple wire goes. This also made my brake light not as bright as it should have been because it was illuminating the running/tail light filament instead of the stop/brake filament. These Altas are programmed so that if a circuit becomes open while operating or is connected to too much load (like if a short developed) that circuit is deactivated until the key is cycled. Thankfully there is some leniency in the headlight circuit, and it will stay energized at 1/3 the load of the original headlamp bulb otherwise my LED setup would require resistors to add load.
 

Rashid510

Well-known member
Forum's Sponsor
Likes
1,171
Location
South San Francisco, CA

Slayer

Well-known member
Likes
67
Location
South Chicagoland

Jared

Well-known member
Likes
159
Location
Arlington, WA
Laughed at this solution initially, but this is were I’m at too. Considering another zip tie fix on the EXR.
If my rear section is ever so damaged from a crash or the like that repair isn’t worth it, then l will adapt the subframe from another bike to fit.
 

Slayer

Well-known member
Likes
67
Location
South Chicagoland
If my rear section is ever so damaged from a crash or the like that repair isn’t worth it, then l will adapt the subframe from another bike to fit.
I think it was sticky mud that pulled one and only one insert out. However, knowing the tail piece was flapping about did distract me enough to crash. Now, I have piece of mind, and a bungee that comes in handy too.

4094D66E-9488-43AE-BEC2-CAC8E4675F9D.jpeg
 

snydes

Moderator
Staff member
Likes
2,798
Location
Pennsylvania
Here is my next attempt at something more substantial for the rear most rear fender mounting points. My original repair lasted longer than the brass inserts, but was still not durable enough to take the abuse. Back to the drawing board to try something better.

First I drilled all the way straight though the fender with a 19/64 drill at the original insert location for the back two mounting points. This is just big enough to clean out the original hole from the now missing brass insert. Next I turned a piece of steel to the size of the new hole in the plastic and drilled and tapped it for the OEM fastener (M5 x .8) and cut it to approximately 1" long. Next I took a regular 5/16" flat washer, slotted the hole a bit and bent it slightly to try and match the fender profile. I next installed the post into the fender to the correct depth (excess sticking out the top) and then did some quick light tack welds to locate it at the correct angle, which ends up being very close to 45 degrees. Once it was tacked in place I removed it from the fender, cut off the excess post and finished welding the washer solid. Grind off the top, finish it however you like and you are done. The only downside is you have an exposed end on the outside of the plastic, but it's definitely not pulling out.
272F587F-6E4B-4C94-A66A-AFA4FEF9C1F6.jpeg662C7AE4-65F0-4C16-BA61-2192EDE1DC36.jpeg
 

hightechnature

Well-known member
Likes
61
Location
Los Gatos, CA
Hey Snypes,

Thanks for initiating this post and for replying to my post regarding my EX with the same problem. I have read your post and am not sure I understand what you did. Please correct me if I got something wrong:

Did you: 1) take the fender off the bike, 2) turn the top fender upside down in order to fill the wallowed out holes with JB weld? Then did you 3) drill through the JB Weld inserts in order to use the screws that Scooter584 recommended (KTM gold screws) from the bottom up to the top of your fender? Are you saying that the finished project only had a the small tip of thee screws protruded outside of the fender? Sounds strong -but did I get this right? Any chance you can post some pictures?

Thanks and happy riding
 

hightechnature

Well-known member
Likes
61
Location
Los Gatos, CA
Hi WWmotors (AKA "No Braaap")

What length screws did you use and how did you make the spacers? Can you post pictures from the underneath looking up?

This looks solid.
 

snydes

Moderator
Staff member
Likes
2,798
Location
Pennsylvania
Hi @hightechnature , I'll try and detail the epoxy fill/self tapping screw method a bit better here.

First you have to remove the rear fender, and position it bottom side up. Next clean up the holes in the plastic where the inserts were, removing any loose debris. I drilled a few small .05 holes in the sides of the insert bosses to allow some epoxy to ooze out for extra bite, this step may not be necessary.

Next I fill the hole to the top with a 2 part epoxy, I’ve tried several flavors but had the best luck with JB Weld 50132 “PlasticWeld”. Regular JB weld gets too hard and will tend to crack when driving in the self tapping screws. When filling the holes, try and force as many air bubbles out as possible, a toothpick helps. Once the epoxy is properly cured drill the specified size hole for the size fastener you will be using.

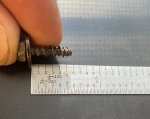
This is what I had laying around that I used;E0B19E9A-DF0E-4BB7-A27A-C101A5D6C843.jpeg

The following part isn’t the exact screw I used but is the same size and type (but with a Phillips head).
McMaster-Carr
You can find different head styles and materials through McMaster Carr. Reinstall fender, if using the screw size I listed you can also use the tiny compression limiters if you still have them.

This repair lasted me almost 1k miles on my bike and was only done in by a particularly rough track day. I’m fairly confident it will hold up well for most applications.

Sorry, I didn’t take any additional pictures in process unfortunately. I’ll try and address any other questions should they come up.
 

hightechnature

Well-known member
Likes
61
Location
Los Gatos, CA
Hi Snydes,

Thank you for the detailed explanation ad the fast response. My bike is waiting for the fix and your fast help means I can get up and running by the weekend. I understand the process clearly now. Thank you again, Bruce
 

Similar threads

Top Bottom