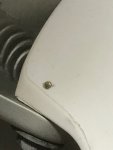
Top Fairing screws


TeslaRaptor

Well-known member
Likes
69
Location
Lake Travis, Texas
In other posts I have admitted I am a Neophyte mechanic. But usually I can unscrew things. But not having much luck with the top fairing screws. On either side on a 2018 MXR.
Just keeps spinning when trying to loosen it. Spins and spins. Both sides.
I loosened the charge port shroud to see if I could get behind it, but there isn’t a nut there or anything that would help to get it out. Any ideas?

note: the ugly (imho) sticker kit came with the bike.....so FYI on that. 😎

image.jpg
 

snydes

Moderator
Staff member
Likes
2,797
Location
Pennsylvania
There are little brass inserts in there too unfortunately. They are spinning in the plastic. You are going to have to try and get something in between and pry/pop them out.
 

Trialsman

Well-known member
Likes
600
Location
Pittsburgh
I ended up using a very small drill and drilling nearly perpendicular through the plastic and into the brass near the bottom. I then pushed in a short section of drill rod until it was flush with the plastic surface. I have had no issues since I made the fix and the brass is anchored within the plastic. Just be careful you do not drill into the screw or you will be - screwed that is.
 

snydes

Moderator
Staff member
Likes
2,797
Location
Pennsylvania
That’s a good suggestion. You will have to take the “delta wing” as it’s called (black piece with the charge port) off along with the shroud(s). If there is access and you can pinpoint the back portion of the brass insert, you can do like Trialsman suggested and pin it.
 

bluefxstc

Well-known member
Likes
887
Location
Boise, ID, United States
I ended up unscrewing the charge port from the "delta wing" so I could then lift the "delta wing" and shrouds off as one piece. Once I had them off I could put pressure on the brass inserts through the "delta wing" plastic with vice grips and unscrew them. There are 6-10 small allen or Torx screws that hold the charge plug to the "delta wing" and a couple more screws/bolts that hold the "delta wing to the bike. It was pretty easy to take off and put it back together. I don't ride fast/hard enough to over heat the bike so the shrouds/knee killers are staying off the bike, I just don't need them.
 

TeslaRaptor

Well-known member
Likes
69
Location
Lake Travis, Texas
I ended up using a very small drill and drilling nearly perpendicular through the plastic and into the brass near the bottom. I then pushed in a short section of drill rod until it was flush with the plastic surface. I have had no issues since I made the fix and the brass is anchored within the plastic. Just be careful you do not drill into the screw or you will be - screwed that is.

i have been trying to picture the angle you are mentioning, but can’t seem to be confident enough in understanding to actually take the drill to that part of the bike.
Can you describe it in a bit more detail or maybe take a pic of where you drilled. Also, once the rod is in place then are you able to take the fairing on and off (not often, but when needed) or still jump through hoops to get them off.

Thx!
 

TeslaRaptor

Well-known member
Likes
69
Location
Lake Travis, Texas
I ended up unscrewing the charge port from the "delta wing" so I could then lift the "delta wing" and shrouds off as one piece. Once I had them off I could put pressure on the brass inserts through the "delta wing" plastic with vice grips and unscrew them. There are 6-10 small allen or Torx screws that hold the charge plug to the "delta wing" and a couple more screws/bolts that hold the "delta wing to the bike. It was pretty easy to take off and put it back together. I don't ride fast/hard enough to over heat the bike so the shrouds/knee killers are staying off the bike, I just don't need them.
My hope is for a permanent/ semi-perm solution.

Will go your route if all others fails.
 

TeslaRaptor

Well-known member
Likes
69
Location
Lake Travis, Texas
The more I investigate this dealer “demo” bike (they told me it was used to show off Altas for prospective buyers). I have now found out that it was raced. Either way I would have bought it.
But, all of the bass insets that I have found so far have issues.

Are there concerns with running the MXR with no front/side fairings. The “ribs” ones. I suspect airflow (I will mostly ride in hot and humid Texas)....besides the heat dissipation (which I get is a real concern). Other concerns with not using the fairings?

Thx!!
 

F451

Well-known member
Likes
921
Location
WA State, USA
The more I investigate this dealer “demo” bike (they told me it was used to show off Altas for prospective buyers). I have now found out that it was raced. Either way I would have bought it.
But, all of the bass insets that I have found so far have issues.

Are there concerns with running the MXR with no front/side fairings. The “ribs” ones. I suspect airflow (I will mostly ride in hot and humid Texas)....besides the heat dissipation (which I get is a real concern). Other concerns with not using the fairings?

Thx!!

Count me in as a brass inserts in plastics on a dirt bike hater.

And I wouldn't be too concerned about a demo bike being raced, its common for dealerships to race their demo dirt bikes, its great exposure for the bikes.

Dirt bikes are pretty abuse averse, especially an electric one. No fears of it having been overheated, valves clearances left unchecked, air filter being neglected, etc. With the Alta, I would think as long as its not obviously been abused with broken bits, you will be fine.

Re the shrouds, I would think no worries riding without them, I really think they are more for looks, or ergonomics, then anything else on an electric dirt bike.

I can't remember which member's bike this is:

NakedAltaNoPlastics.png
 

TeslaRaptor

Well-known member
Likes
69
Location
Lake Travis, Texas
i have been trying to picture the angle you are mentioning, but can’t seem to be confident enough in understanding to actually take the drill to that part of the bike.
Can you describe it in a bit more detail or maybe take a pic of where you drilled. Also, once the rod is in place then are you able to take the fairing on and off (not often, but when needed) or still jump through hoops to get them off.

Thx!

nevermind. I demolished the delta wing I have....so ordering another one from Liquid Perf. Will take the dremel to this one to save the fairing screws. Likely to run it naked for a while.

I never realized I could hate a small piece of brass so much. 😱

4428F19C-B5F6-4128-9834-DFB778AD5BFB.jpeg
 

VINSANITY

Well-known member
Likes
398
Location
Texas
I stripped the brass inserts very quickly - for the top shroud bolt I now use an automotive plastic push in connector - that connection really doesn’t need a bolt as it snaps in place pretty good.

A812D6A1-603D-4861-9BFB-96F2E835C646.jpeg
 

TeslaRaptor

Well-known member
Likes
69
Location
Lake Travis, Texas
I stripped the brass inserts very quickly - for the top shroud bolt I now use an automotive plastic push in connector - that connection really doesn’t need a bolt as it snaps in place pretty good.

do those plastic plugs come in sizes? If yes, what size did you use? Sounds like a great solution!
 

VINSANITY

Well-known member
Likes
398
Location
Texas
I went to Ace hardware and got a few different sizes - take the original bolt with you for reference - I might use them in a few other locations where strength is not needed
 

Trialsman

Well-known member
Likes
600
Location
Pittsburgh
If you decide to pin it you will need to drill perpendicular to the bolt. Although this is not the same location, it is the forward shroud insert. You can see the hole is located near the end of the bolt yet still going through the brass insert. I have had no issues since doing this. The same method could be used anywhere leaving only a tiny metallic end (I guess I used brass brazing rod from the color of it.)

IMG_6722.jpg

As for the rear fender, before they got tweaked and the inserts got pulled out of place, I put a bead of silicon between the fender and the inner fender. This also has stopped the progression of the looseness. I have had the fender apart twice, to put in the resistors for LED turn signals and each time everything was solid.
 

Rashid510

Well-known member
Forum's Sponsor
Likes
1,171
Location
South San Francisco, CA
What boggles my mind is the number of owners/dealers/racers/users not understanding how to torque bolts. Why do the brass inserts strip? Y'all like to torque them way too much. The torque that is needed for the hardware to clamp down is 4Nm (35 in-lbs). That isnt that much with a human torque wrench...

What is the average torque for KTM plastic?
 

VINSANITY

Well-known member
Likes
398
Location
Texas
I think the issue is the threads corrode a little overtime so when you go to remove a bolt it strips the brass inserts.
 

snydes

Moderator
Staff member
Likes
2,797
Location
Pennsylvania
I think the issue is the threads corrode a little overtime so when you go to remove a bolt it strips the brass inserts.
Every bike I’ve owned since my very first MX bike that had an insert stripped in the gas tank, I remove any hardware in contact with brass threads and coat the threads with anti-seize. It doesn’t help that there is a lot of thread locking compound used throughout these Altas as well.
 

Similar threads

Top Bottom