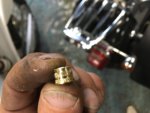
Little brass thread inserts in plastic -- How to fix


thsm007

Well-known member
Likes
57
Location
New York
Mine also failed. I used the JB weld. That lasted a couple hours. My solution was to drill a hole and now I have a bolt showing on both sides. I don’t like this in terms of aesthetics but I know it’ll hold and i have limited time and patience to deal with this. I’ll just replace the rear fender when I sell it. Works fine for me I guess but again I do not love this.
 

privateer703

AOF Addict
Likes
687
Location
Altoona, PA
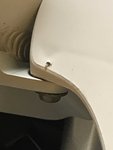
So to revive an old thread, I had this same issue on an insert on my fender, so I decided to try and heat set it back in. I very lightly clamped my soldering iron facing vertically, so I'd have two hands to use, and placed the insert directly on the tip. The tip on my iron was about the right size as the point did not protrude past the bottom of the insert. I then took some pieces of plastic I had cut off the subframe ribs to fit some batteries and melted some onto the insert. This way I was adding a little more plastic into the opening. Then, using a gasket pick to keep the insert onto the iron while I flipped it upside down, I put the insert into the old post and it melted it's way back down into it. I let it cool, then put the screw back in and it held pretty tight. It's not perfect and it will probably strip out again, but you could do this technique every time and it doesn't affect the plastic properties all that much. Since I was already at it, I also decided to see if I could "weld" up the small cracks in the subframe-fender insert posts. Using the scrap plastic as filler, I used the soldering iron to melt the posts at the crack and then re-smooth the plastic. It worked pretty well. Here are some pics. The white plastic got a bit gray from the leftover silver on the soldering iron. Here is the insert back into the fender, you can kind of make out the melted plastic around the edge:20190402_182032.jpg
Here are some shots of the Post I "welded". First the crack:
20190402_182337.jpg
Same post after welding:
20190402_182914.jpg
Top view:
20190402_182936.jpg
And because I know someone will ask, here is my subframe with the standalone wiring/batteries.
20190402_180918.jpg
 

privateer703

AOF Addict
Likes
687
Location
Altoona, PA
Also, if you have a loose insert, you can use this technique, but I found that it's much harder to get the insert to temperature when it's already in the post, probably due to the plastic acting as a heat sink. Better solution to this is to thread in a very long screw into the insert and put a torch to it. The your insert will get plenty hot to re-melt the plastic and re-set itself.
 

Motophyllic

Well-known member
Likes
334
Location
NY
I had 2 of mine come out as well. I bought slightly larger brass nuts and used a hot soldering iron to simply push them into the hole. The plastic molded around them and it holds and looks like new.
 

privateer703

AOF Addict
Likes
687
Location
Altoona, PA
At first I was considering going with these tapping inserts from McMaster:
threaded inserts
But then read that ABS is easily re-melted and formed without any changes to material properties. If I do ever lose one of these inserts, then I'll probably try these tapping inserts, so long as there is enough "meat" in the posts to accept them.
 

Philip

Administrator
Staff member
Likes
4,215
Location
Lake Havasu City, AZ
I like the McMaster inserts too. If they ever come loose they will not fall out right away. Also, when removing, they will either unscrew themselves or screw themselves in tighter, depending on which side the screw is coming from. Screwy business!
 

Redwolf

My dog thinks I'm cool
Likes
1,677
Location
Brinnon, Wa.
But then read that ABS is easily re-melted and formed without any changes to material properties.
This is not an entirely true assumption, every melt/freeze cycle will degrade the material, and the more heat used per melt, the faster the degredation. The thermoplastic will become more brittle each time it is heated and melted, but for a small number of melt cycles the effect will be minimal.
 

Mikec265

Well-known member
Likes
270
Location
16412
My fender inserts went to hell riding in the stickiest mud know to man. The stuff that keeps building up and won't fall off. The chain slider didn't like it either.
 

Oded

Well-known member
Likes
869
Location
Israel
I had enough of these brass inserts. They keep on dislocating. The whole rear fender is not well designed.

I fixed it with these elastic belts. The load from the brass inserts and screws is lessened, and works well..

20190405_073745.jpg20190405_073740_HDR.jpg20190405_073759.jpg
 

Trialsman

Well-known member
Likes
600
Location
Pittsburgh
I had problems and took a different approach. I drilled a cross hole 1/16" diameter about 1/16" away from where the bottom edge of the brass insert would be located. I inserted a piece of 1/16" brass brazing rod into the hole going through the end of the insert and locking it in position. Problem solved and all that shows is the tiny end of the brass rod. One potential problem is if drilling too near the surface end and the mounting bolt gets drilled. Measure carefully but it is an easy, permanent fix.
IMG_5637.jpg
 

Redwolf

My dog thinks I'm cool
Likes
1,677
Location
Brinnon, Wa.
I had problems and took a different approach. I drilled a cross hole 1/16" diameter about 1/16" away from where the bottom edge of the brass insert would be located. I inserted a piece of 1/16" brass brazing rod into the hole going through the end of the insert and locking it in position. Problem solved and all that shows is the tiny end of the brass rod. One potential problem is if drilling too near the surface end and the mounting bolt gets drilled. Measure carefully but it is an easy, permanent fix.
View attachment 2879
As a machinist in a former life, I like this fix.
 

Jared

Well-known member
Likes
159
Location
Arlington, WA
I too am experiencing the brass inserts pulling out of the rear fender (I will spare you the picture). I also noticed that the subframe brass inserts on the right side are cracked. Not sure why/how this is occurring but I am disappointed in the durability of the plastic. I have only 7 hours on the bike and it looks like it will not be long and I will need a new rear fender and possibly a subframe. I hope they revise the plastic soon and replace it with something a bit more dirt bike worthy.

While I am on the topic of plastic, the side number plates are also very flimsy as they have no subframe support behind them. My right side is already showing signs of cracking. On an ICE bike, one side had the muffler to support it and the other side met up with the subframe. I really don't what to have to keep buying new plastic all the time. On my last bike the plastic would last for years.
View attachment 1179
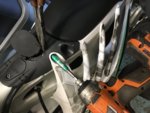
Whose idea were these? The only permanent fix I have found is to drill 7/64” holes perpendicular to the insert (at least 3 of them at 90* intervals) through the plastic and into the insert and then put them together with JB weld after cleaning everything with toluene.

91580F83-949A-4623-B4A0-CABC3A6F4AA6.jpeg

8CFF7ADF-EE95-4C8A-9C6B-B164CD2AB796.jpeg
 

Rashid510

Well-known member
Forum's Sponsor
Likes
1,171
Location
South San Francisco, CA
How much torque are you guys putting on these bolts?
The number one issue with the brass inserts is either some one over-torqued the screw which led to the insert shredding in the plastic.
Or guys forgot the compression limiters on the number plates and cross-threaded them...
 

Jared

Well-known member
Likes
159
Location
Arlington, WA
I have resorted to about 30 inch pounds and using permatex gasket sealer on the bolt threads to prevent them from vibrating loose or corroding in place from moisture getting trapped on the threads...so far so good.
 

Similar threads

Top Bottom