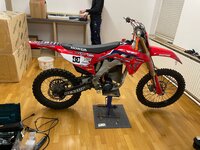
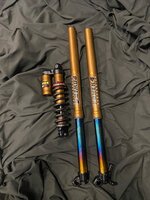
Yet another CRF 250 Build but its my first so... ;)


fmxxx666

Well-known member
Likes
68
Location
Hamburg Germany
Thanks Dave, I will of cause post every progress here.
Currently again waiting for some parts to get the Battery mount done.
Also waiting on 4AWG Cables and additional QS10 Connectors to get the Leads from Battery to Fuse to Batteryswitch to Controller to the correct length.
(little sidenote it was quiet a hassle to solder that large cables to a QS10 Connector when I was shortening the too long ordered Battery Cables)
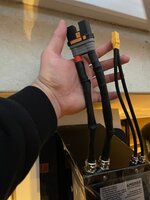
Unbenannt8.jpg
It needed some extra heat usually I solder everything with 300 degree celsius but this time I had to go up to 450 degrees as there is such a large metal surface you need to heat up and I had to use a ton of solder xD
but now the cable is in a managable length :p


I have actually planned to do a California round Trip in a RV tackling all the typical tourist spots with Wife and Kid within the next 2 years.
 

halg

Member
Likes
8
Location
MD
As far as thermal limits, the QS138 70H V3 is quite good. We ( probably 20+ DIY Bikes with pretty much the same QS138 70H V3, EM260S, 72V 50AH with an ANT smart BMS ) have not overheated the motor, We have overheated the controller without water cooling, and we have overheated the battery. The best counter for the battery is to get the BMS out of the battery box, go to Open Discharge (no BMS control of discharge), and /or make the battery so you can quick change it, and cool it during charge. The battery warms up while being used. If the BMS is inside the Battery box, it induces heat into the battery, your first moto or practice is fine. Come in to charge the warm battery, add more heat. Run second moto or practice, add more heat. Come in to charge a hotter battery and it will allow charge or not because it is already hot, or it will stop in the middle of a charge. It is slow to get the heat out of the battery box.
One friend has made it easy to change the battery, in a 2003 CRF450 . He has the whole build here on this forum Starting my bike build.
Hi Don. First off thanks for your contributions here. It has helped immensely in my planning.

I'm wondering what the real risk (if any) is of ordering my battery with open discharge. I can see how keeping the discharge current from flowing through the BMS and some of its relatively higher resistance parts helps reduce the heat. Which I think overall is a good thing in this application.

However, take a case like this:
1. Ride several laps - add heat
2. Charge - add heat
3. Repeat 1 and 2 some number of times adding heat
4. Charge - add heat and someone just happens to stop charging right below where the temperature BMS would normally cut off discharge if it was in the loop
5. Ride the bike all the way down - add heat that puts the battery above what the BMS would normally consider too hot if it was in the loop (Edit: I don't mean run the battery all the way down I mean down to the point where the controller shuts the bike down or goes into limp mode)

In step 5, with an open discharge battery, is it accurate to say that the battery would continue to discharge normally and continue adding heat even though it is above what the BMS would normally consider too hot? It seems to me it would.

Finally, do you know what temperature the ANT BMS that come from Amorge disconnect charging? If the answer to the above question is yes, then I'd like to know to tell people to bring it back if that is exceeded while riding.

There is risk everywhere in life. Heck even riding dirt bikes at all is a relatively high risk activity. I just usually like to believe I understand the risks with anything I build.

Thanks again!
 

fmxxx666

Well-known member
Likes
68
Location
Hamburg Germany
Hi @halg
I looked into this as well before I decided to go with an open discharge battery.

My ANT BMS still monitors the battery’s temperature and it will beep when hitting the threshold.

You can define the temperature threshold yourself in the ant bms app.

I have no experience yet with what temperatures it reaches under heavy load as I am still yet to finish my build and it’s freezing cold outside here at the moment so even on my test runs heat is the last thing I care of atm :p


my controller display on the handlebar shows me controller and motor temperature and for the battery I would have to look up on my phone to get an exact figure but to regularly hand feel the battery’s temperature between laps to get an idea what type / length of riding would get it to what kind of heat is still on my list for the learning curve about this subject.

When I look into the specs of my battery cells (molicel p45b)
They have a charge cut off at 70 degrees Celsius
And they have a discharge cut off at 80 degrees Celsius.

So I would setup my ant bms to warn me at somewhere 50-60 degrees Celsius as this is actually already pretty hot in my eyes.
 

halg

Member
Likes
8
Location
MD
Hi @halg
I looked into this as well before I decided to go with an open discharge battery.

My ANT BMS still monitors the battery’s temperature and it will beep when hitting the threshold.

You can define the temperature threshold yourself in the ant bms app.

I have no experience yet with what temperatures it reaches under heavy load as I am still yet to finish my build and it’s freezing cold outside here at the moment so even on my test runs heat is the last thing I care of atm :p


my controller display on the handlebar shows me controller and motor temperature and for the battery I would have to look up on my phone to get an exact figure but to regularly hand feel the battery’s temperature between laps to get an idea what type / length of riding would get it to what kind of heat is still on my list for the learning curve about this subject.

When I look into the specs of my battery cells (molicel p45b)
They have a charge cut off at 70 degrees Celsius
And they have a discharge cut off at 80 degrees Celsius.

So I would setup my ant bms to warn me at somewhere 50-60 degrees Celsius as this is actually already pretty hot in my eyes.
great to know that it beeps. thanks. something you could actually hear b/c you are riding an electric bike!

i went (relatively) cheap with my controller which is a votol em260sgtp so i'll be figuring how how to monitor all those temps since it did not come with a display.
 

DonCox

Well-known member
Likes
465
Location
Lake Havasu City, AZ
Good questions. On a very hot day in the middle of the summer we ran into the most heat problems. The ANT BMS does give you temp readings and records them. The date /time is a little difficult to calculate, but it is recorded. The Open Discharge setup is not stopped by overtemp, it will just stop you from charging again. My original setting was at 60C , so I upped it in my controller to 70C, and it allowed for more run time. I think the temperature rating on the cells has to do with output rating, I don't believe at these numbers are at a fire danger?? My one battery would overheat, but not the other, which I never understood. Maybe it is the position of the temp sensor in the battery.
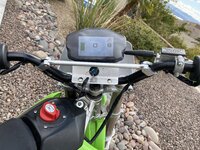
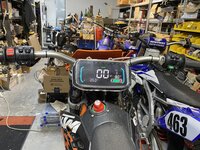
The Votol controller, EM260SGT and all of them, do not record errors. They report them, and the motor and controller temps, on the display page, and in the light flashing code, but, no permanent recording. I would recommend going with one of their displays. It reports the codes with Icons on the screen ( but not the temps) , but it will display a temp icon on the display. The display pictured here is a really good one. I have a movie of the display, which I will put on youtube, and I will get you the Aliexpress link for this display. I have tried many of the Chinese displays, and some are terrible to read, but this one is good to read, simple and informative. Another is good also, but a little larger one is on the KTM

IMG_5863.JPG

IMG_5364.JPG
 

Dave Daum

Well-known member
Likes
50
Location
San Diego
I'm struggling with the oversensitivity of the Surron throttle that came with my E&C kit. I purchased and received an QS e-cable throttle assembly. Are there any tricks to connecting it to my Votol EM 260?
 

Dave Daum

Well-known member
Likes
50
Location
San Diego
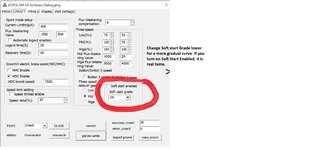
Before you change the throttle, there are settings in the software that lets you soften it up. Adjust this number down from 16 toward 2 , 2 is very soft, 16 is aggressive.

View attachment 12936
Wow what a difference! I went through several different settings. Balancing the right amounts of engine braking and soft start make the throttle response so much more pleasant. Now I'm able to roll up to slow speed obstacles and gently torque my way over them. Over rolling bumps I can now modulate the throttle so the bike no longer jerks and lunges out of my hands. And, it is so easy to change as conditions change. The bike has become an absolute dream to ride!

Thank you @DonCox for all you help. You are greatly appreciated. Let's ride soon
 

fmxxx666

Well-known member
Likes
68
Location
Hamburg Germany
so something regarding safety while riding
While talking to a dude who has also made his CRF Electric some time ago and currently building a second one he asked me what I did in regards of Killswitch.
Then I said the Big Red thing on the Tank and additionally I also have this ON / OFF switch for my Controller on the Handlebars.

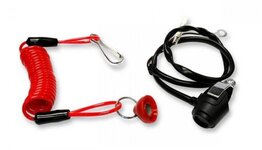
then he said no I mean something like an emergency pull off kill switch you attacht to your body with a line:
474045240_122207693522226000_5275695505458733142_n.jpg


so in case you drop off your bike it falls to the side and gives whisky throttle constant or whatever say you are not able to get there fast and stop it
as I think most other helping ppl around may don´t know how to shut off your bike or are even afraid it jumping at them any moment while the rear wheel rocks at full speed.

So I was thinking its not the badest of ideas to install such a kill switch but now comes the tricky part I thought ok I will just install it instead of my on / off switch of my controller but then I learned that it might kill the controller if you shut it off while its on full throttle.
because of the uncontrolled regen current running from your motor back to the controller something like that (not an expert in this but a guy from EBMX told me this so he should know)
he suggested me a Smart idea I didn´t came up with on my own.
He said just install this Killswitch on the Positive wire of your Throttle.
So you fall of the Bike Throttle ist automatically at Zero and everything stays on and controlled.


I just felt the need of sharing this idea ✌️
 

fmxxx666

Well-known member
Likes
68
Location
Hamburg Germany
@mike61
Moin,
das ist sogar nur ne Stunde weg von mir. ;)
Du fährst ne Stark?
Wittenburg liegt ja recht günstig in der nähe von ein paar strecken.
Ich wohne praktisch luftlinie 2km von der MX Strecke in Tensfeld weg.
 

DonCox

Well-known member
Likes
465
Location
Lake Havasu City, AZ
so something regarding safety while riding
While talking to a dude who has also made his CRF Electric some time ago and currently building a second one he asked me what I did in regards of Killswitch.
Then I said the Big Red thing on the Tank and additionally I also have this ON / OFF switch for my Controller on the Handlebars.

then he said no I mean something like an emergency pull off kill switch you attacht to your body with a line:
View attachment 12968


so in case you drop off your bike it falls to the side and gives whisky throttle constant or whatever say you are not able to get there fast and stop it
as I think most other helping ppl around may don´t know how to shut off your bike or are even afraid it jumping at them any moment while the rear wheel rocks at full speed.

So I was thinking its not the badest of ideas to install such a kill switch but now comes the tricky part I thought ok I will just install it instead of my on / off switch of my controller but then I learned that it might kill the controller if you shut it off while its on full throttle.
because of the uncontrolled regen current running from your motor back to the controller something like that (not an expert in this but a guy from EBMX told me this so he should know)
he suggested me a Smart idea I didn´t came up with on my own.
He said just install this Killswitch on the Positive wire of your Throttle.
So you fall of the Bike Throttle ist automatically at Zero and everything stays on and controlled.


I just felt the need of sharing this idea ✌️
Most electronic motor controllers used in Bicycles and Motorcycles have brake switches and a circuit to disable motor action when the switch on either brake is closed. If you disconnect the line, the motor works. If it is connected and you close the switch and the motor stops, regen comes on and the motor stops, all normally. That brake signal could be used, on your Emergency pull off switch( Kill Switch with lanyard), to stop power to the motor, with no danger to the controller. On or motocross bikes we do not normally use this function, but it is in most controllers.
 

fmxxx666

Well-known member
Likes
68
Location
Hamburg Germany
So today was the day of days :love:


Battery is Seated
for now, will get some more love in the near future with some mounts but it sits so god damn snug in there at the moment there is no movement in any direction
I will put some hard 1mm Rubber between Battery case and where it meets the frame so that there is no longer working metal on metal.
little Test setup plugged everything together wild and free (kabel management will be done another day) threw on the Tank and Seat and went for a super short test ride on my buddys Parkinglot middle of the night:
Unbenannt2.jpg
here a little video I have set it to 8KW 220Amps and limited it to 30KM/H just to see how it works didn´t wanna crash it there when something was not right yet.


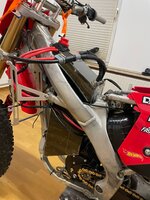
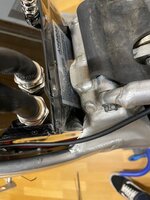
Had to file just a tiny tiny bit on the two edges of the Shock Dome to get the Battery in:
Unbenannt3.jpg

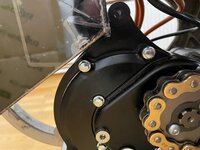
also filed away a bit from the Top of the Motor

Unbenannt5.jpg

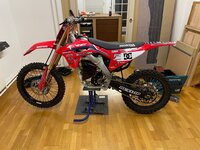
here it is in all its glory for now:
Unbenannt8.jpg
Unbenannt10.jpg

to do´s:
-Install Fancy Rear Wheel ( hat to put the oem wheel back on as I noticed my now Red Black Haan Wheels had the wrong Spacers with it... correct spacers will arrive next week)
-Cable Management ( will redo the whole harness from Battery to controller as it is just the Testsetup now will have them in better flow invisible underneath the tank soon, same goes for all the small cables that go from controller to the Handlebars)
-Install CRF450 Carbon Tank Cover ( got a cover today will take off a lot more from the current Tank until it only serves the mounting points for the Seat and the Carbon Cover will hold the shroud plastics and the Battery on / off switch)
-Aluminium Battery Cage (I may rethink the initial plan as the battery is already in there so snug I might only do some bars right and left that are more for aesthetics)
-take the whole thing apart again and lockthight everything thats needing it and get every screw to the right torque
-Day at the MX track to see how it performs
-source 2021+ Fork and Triple Clamps to upgrade from Showa47 Forks to Showa49´s once I find some, keeping an eye on the used market all the time. then get the whole thing to the Suspension Guru and give it the ultimate Factory Look with some DLC Coating etc. and set it up for the new Bike and Riders wight. I will do this kind of Color choice:
Unbenannt11jpg.jpg

thanks again to all of you who helped to get me where I am now.
I am super stoked about my build so far.
 

bayodome

Well-known member
Likes
129
Location
Brooklyn, NY
So today was the day of days :love:


Battery is Seated
for now, will get some more love in the near future with some mounts but it sits so god damn snug in there at the moment there is no movement in any direction
I will put some hard 1mm Rubber between Battery case and where it meets the frame so that there is no longer working metal on metal.
little Test setup plugged everything together wild and free (kabel management will be done another day) threw on the Tank and Seat and went for a super short test ride on my buddys Parkinglot middle of the night:
View attachment 12972
here a little video I have set it to 8KW 220Amps and limited it to 30KM/H just to see how it works didn´t wanna crash it there when something was not right yet.


Had to file just a tiny tiny bit on the two edges of the Shock Dome to get the Battery in:
View attachment 12973

also filed away a bit from the Top of the Motor

View attachment 12974

here it is in all its glory for now:
View attachment 12975
View attachment 12976

to do´s:
-Install Fancy Rear Wheel ( hat to put the oem wheel back on as I noticed my now Red Black Haan Wheels had the wrong Spacers with it... correct spacers will arrive next week)
-Cable Management ( will redo the whole harness from Battery to controller as it is just the Testsetup now will have them in better flow invisible underneath the tank soon, same goes for all the small cables that go from controller to the Handlebars)
-Install CRF450 Carbon Tank Cover ( got a cover today will take off a lot more from the current Tank until it only serves the mounting points for the Seat and the Carbon Cover will hold the shroud plastics and the Battery on / off switch)
-Aluminium Battery Cage (I may rethink the initial plan as the battery is already in there so snug I might only do some bars right and left that are more for aesthetics)
-take the whole thing apart again and lockthight everything thats needing it and get every screw to the right torque
-Day at the MX track to see how it performs
-source 2021+ Fork and Triple Clamps to upgrade from Showa47 Forks to Showa49´s once I find some, keeping an eye on the used market all the time. then get the whole thing to the Suspension Guru and give it the ultimate Factory Look with some DLC Coating etc. and set it up for the new Bike and Riders wight. I will do this kind of Color choice:
View attachment 12977

thanks again to all of you who helped to get me where I am now.
I am super stoked about my build so far.
Bike looks awesome! Congrats!

On your battery fitment, it's great that it's so snug, but I highly recommend doing a proper mount, both for your safety, the safety of others and for the battery's protection. If you were only riding street then it wouldn't matter, but if you're doing MX, the stresses g-forces that a bike endures while on the track need to be accounted for.

The way it's resting directly on the motor is not ideal, and one hard hit could put undue stress on that part of the motor casing, and even worse, on that very nice metal case of the battery. Don't forget, there are cells right underneath that... you did design it after all.

Also, in the case of a bad crash, if the battery is not properly secured, you very well could have a 50 pound projectile flying towards who knows where. Not ideal.
 

fmxxx666

Well-known member
Likes
68
Location
Hamburg Germany
@bayodome
sure thing no worries I will fix that battery in its place.
It will get support from right, left, bottom and one open closable bar from the top.
I will grind off some more from the top of he motor anyway to gain space for the support frame.
 
Top Bottom